Showing posts with label work smarter not harder. Show all posts

Tuesday, July 7, 2020

Moving Rocks


What we learn with pleasure we never forget.
~Alfred Mercier

  
This triangular shaped bed contained an ornamental plum which was way too big of a tree choice to be planted in a space of this size. Before we moved in it had been pruned on two sides to keep it away from the house and gutters. That made it grow vertical sprouts over 2/3s of its canopy and normal outward branches on the side that didn’t get pruned. The unpruned side became heavy and was the leeward side so wind could potentially topple this tree. I decided early on it would have to come out.

The bed also contained Helleborus, Sedum, and Ajuga reptans. Being adjacent to a walkway the Ajuga had to be relocated. Anytime you plant near a sidewalk you will be happier if you don’t choose plants that have a far-reaching habit. Ajuga is great for carpeting large areas quickly but here it was in a pretty confined space. It spreads by reaching out in all directions with new stem growth that roots when it touches the soil. At a sidewalk it will quickly overrun it’s borders and you will have created more work for yourself because you will have to keep cutting it back.

As for the tree, I had a tree service come cut the tree down. It is fine to leave the stump in this case, as I can plant around it and it will rot in time. I am not a fan of chemical use but to leave a stump in place to rot over time, you may have to apply a chemical to the freshly cut stump to stop it from re-sprouting. It depends on what type of tree it is. Here I used a chemical herbicide on the cut end only. Minimal use.


Then I took out all the Helleborus and Ajuga in that bed. Being a shade loving plant, I relocated some of the Helleborus to a shadier spot, since the tree was providing shade in that bed. The majority of them I gave away to neighbors.


The bed was edged with large rocks on all three sides. It is a slightly raised bed toward the middle where the tree trunk was. The rock placement didn’t really do anything for the bed. I kept tripping on some because they lined the walkways on two sides and stepping on others near the water faucet, so I pulled them all out and set them aside in a pile. In so doing I was surprised to find they were lava rock and super lightweight.

As I was contemplating how to plant my now empty and raked bed with the stump in the middle, the word “outcropping” kept coming to mind.

So, that’s what I did.


I started by planting those lava rocks. Outcropping also creates little pockets that stabilize slopes and hold water better for your plants. Whenever you use rocks in the landscape, they should be buried up to 1/3 deep so they look natural. You “plant” your rocks, don’t just lay them on top.

Then I added in some plant divisions from my former garden, and a couple of new plants, one that I purchased and one that was a gift from our realtor and friend Gina . Best. Realtor. Ever!

Last but not least I topped it all off with a clay pot, which I balanced on top of the stump with soil and rocks. Can’t even see the stump now and it will rot over time.


What do you think? I’m pretty happy with how it turned out. Now I need to go shopping for a vine maple which I will plant behind the pot for some vertical interest, fall color and will provide annual leaf mulch. Even at a mature size, a vine maple is a good choice for this space and it won’t require pruning to keep in confined.


And if you are lucky enough to find a fantastic tree guy as I did, he won’t roll his eyes when you ask if it would be too much to ask him to cut some of the trunk into stepping stone size thickness for your use in other parts of the garden. Well it never hurts to ask, right?
Thanks Rich at Signature Tree Service !   You made my day!

 In Bloom in My Garden Today: Cuphea Vermillionaire, Lobelia laxifolia, Gillenia, Yarrow, Potentilla, Sedum, Oregano, Daisy, Rose, Thyme, Dianthus, Nepeta

Authors photos

Tuesday, June 30, 2020

Grass, Grass and More Grass


“Think back to the first time you explained to a nongardener that the lawn is just the place you stand when looking at your plants”
~ Steve Aitken, editor of Taunton’s Fine Gardening magazine

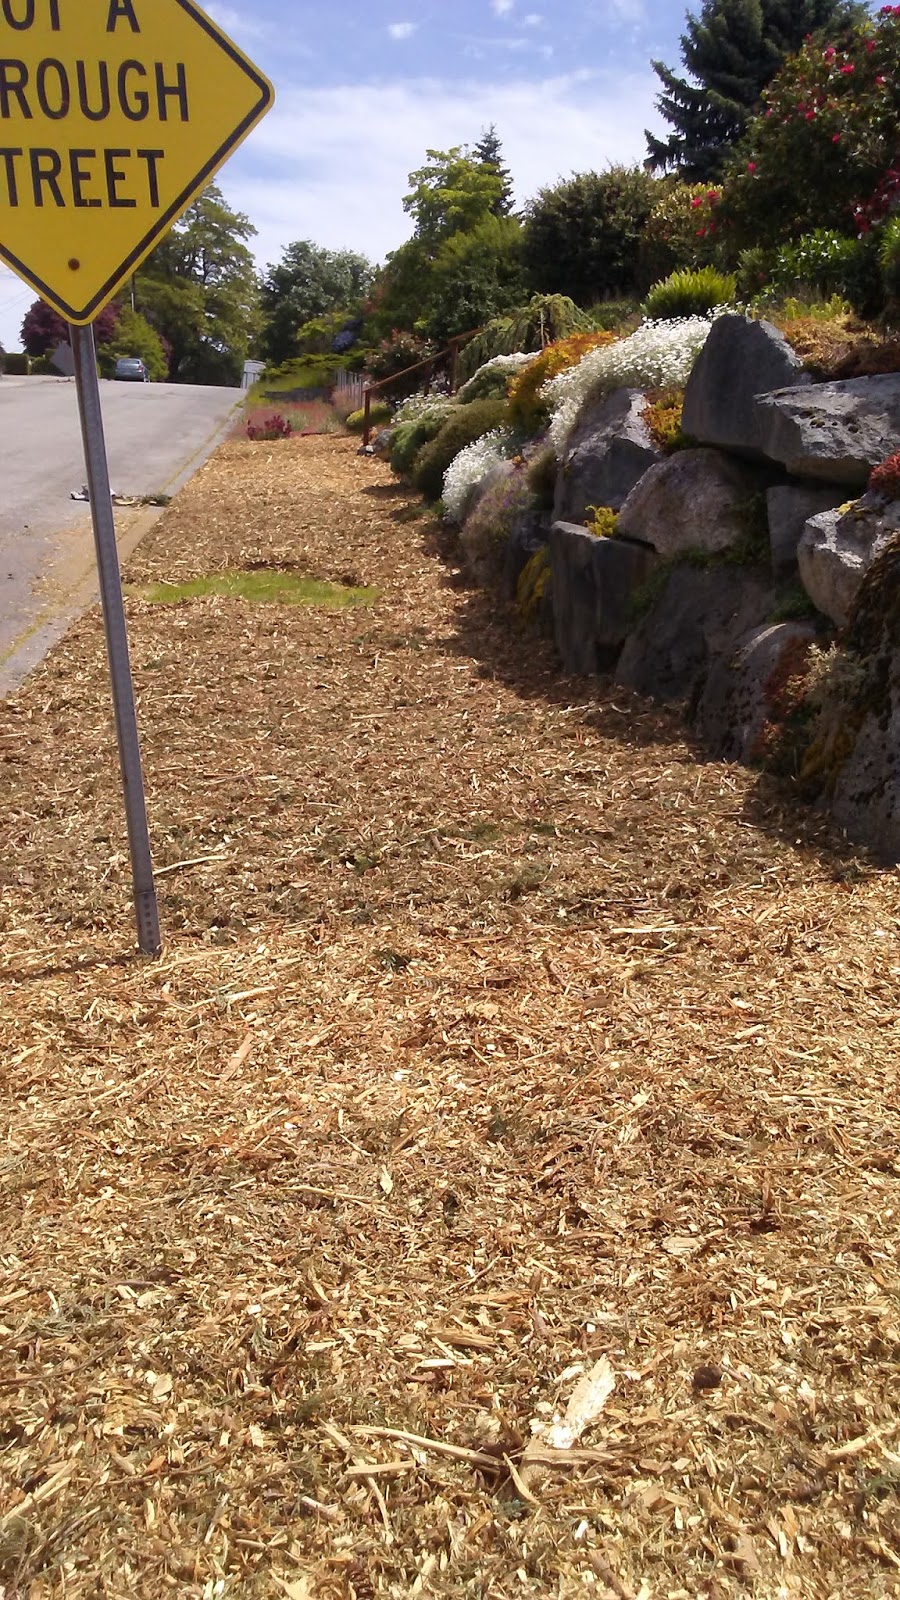
This place has a ton of lawn space. There is a huge strip of grass along the street, and being a corner lot, it wraps around the corner and goes partway up the perpendicular street. Then there is an upper strip along the front of the house. Then there is more on the east side of the house that wraps around the back and extends partway along the south side.

I like some grass in the landscape but for us, that is way too much to maintain and mow. Currently my better half and I share the mowing and grass maintenance jobs and neither of us want it to be more than a 30 minute endeavor. I, personally would rather spend my time gardening, or hiking, kayaking, going on long walks, not tending grass. However we both want to do the mowing as part of our outdoor exercise which is why we don’t hire it out. Mowing grass is a good cardio workout in the fresh air in the sun. But 30 min or less mowing is plenty of that particular activity. And it is easier to keep a properly mulched garden watered and weed free than acres of grass.

So, one of my first priorities, after getting control of the weeds in the garden spaces and grass, was to lessen the overall amount of grass. As you have read in previous posts on my blog I have had good results in smothering grass with cardboard topped with mulch or dirt. I will be doing that again in the back and side yard as you will see later, but this street side grass is too monstrous an area to lay cardboard and paying for yards of compost would be much too costly.


So, I decided to use wood chip. Not beauty bark. Wood chip. You can read my reasons why here, but for now suffice to say ‘free’ is my kind of price. I did pay an arborist his asking price for these first 12 yards because I wanted it now, he had it now, and I wanted him to drive and dump it along the street up on the grass in a stripe as long as he could get it. Not all arborists give it away free but many do.


I didn’t want to come home to find a tall pile dumped all in one heap and in the wrong place so I was getting picky and there are times you have to pay to get things your way. Subsequent chip loads I am getting free from other local tree trimming service companies to finish the job, since 12 yards wasn’t enough and I need to thicken the layer. I tried to rake it out to 6-8 inches thick but being such a large chunky medium, grass in some areas is finding the light and pushing its way up. That happens when cardboard isn’t used underneath your mulch. Mulch or dirt over cardboard doesn’t have to be so thick as the card board does the job of cutting off all the light. Chip takes a bit more supervision to get the job done. But in the end, it will work and, in the fall, or late winter it will be ready for my planting ideas.


It took me 2 days, 6 hours each to rake all this out and wheelbarrow it around  from the main drop. And yes, I mean me, moi, by myself. I don’t often ask my better half for help doing this kind of stuff even though he is willing. The garden is my love and joy, the easy parts and the hard parts. If I can’t do the work I need to come up with a different hobby. I will give credit to where credit is due when I do ask for help, but for the most part all the work you see in my posts I have done myself unless otherwise specified.


I am toying with planting options right now. I want to plant low growing shrubs so as not to cover the beautiful rockery. Viburnum Davidii, St John’s Wort (shrubs not ground cover), Burning Bush (Euonymus compacta), Spirea, Daphne ‘Eternal Fragrance’ among others are making the list. In a few years’ time when they begin to fill in I will no doubt give you a before and after post of that area again.

And the very next day, literally barely 12 hours later, the gas company decided to do work in the area and found my lovely property the perfect place to lay their pipes as a staging area! Arrgh!!! They walked all over it, churning up the chip layer and generally messing up much of my hard work. My fear was if they churned it up it would be thinner is some areas and the grass would get through.


I did, nicely, explain how I had just finished raking all that out and my reasons for doing it and asked them please be careful. Happily, they removed their stuff and attempted to smooth it out but some damage had been done. Sigh. The churned-up areas did allow light to reach the grass under and it had started to poke up through. My next load was a finer consistency, so it compacted better to suppress the light. I piled more where I needed it. Now I can leave it all to rest and get onto other parts of the garden.

In Bloom in My Garden Today: Hebe, Shasta daisy, Cuphea “Vermillionaire”, Calendula, Rose, Hydrangea, Veronica, Dianthus, Nepeta, Gillenia, Sedum, Bletilla, Potentilla, Oriental Lily, Digitalis, Salvia,

Author’s photos


Tuesday, November 26, 2019

A Well Placed Rock


How fair is a garden amid the trials and passions of existence.
~Benjamin Disraeli

If you know you have a special spot on which passing dogs frequently leave their calling card, instead of fighting the inevitable, I suggest you work with the situation. You’ll be much happier. 

When I was working at the nursery, I can’t begin to tell you how many people came to buy plants that were to replace one that died because dogs kept “leaving their mark” on it until in death did it depart.

As I walked them toward the statuary/rockery area, I told them there is no use in replacing a plant, since a new one will likely succumb to the same demise if planted in exactly the same spot. The scent is still in the ground surrounding the planting site and if it remains accessible to passing dogs it will be a target too.

Consider a different choice of target. I used to have a heath (Erica carnea ‘Springwood White’) where you see the rock now. As you can see it’s easy leg-lifting distance from the sidewalk so even a leashed dog can hit it easily. The plant was half dead when I moved it 3 feet further away from the sidewalk. In no time at all it recovered and quickly regrew to its original size. 


That bright rock may look a little stark to you but that’s kinda the point. Think “visible target”.

Prominently placed rocks are a natural and beautiful addition to any garden. Professional landscape architects use them all the time. When using a large rock, always partially bury it so it looks like it would in nature. Try not to just plunk it down right on top of the dirt surface. Make sure it’s big enough to attract attention so that IT will draw Fido’s eye, not the plants around it.

You could use garden statuary or something carved from natural stone, both should last a long time. I would not use anything made from raw concrete. I think the acidity would eventually degrade your investment. 


 In my garden, that rock has been there for years with no signs of decay, and I have witnessed it’s “popularity”. Sadly, it must also be considered that whatever you use could be a target for theft so in my urban garden a big rock is perfect.

Happy gardening!

In Bloom in my Garden Today: Alyssum, Aster, Coreopsis ‘moonbeam’, Crocus, Cuphea vermillionaire, Cyclamen hederifolium, Daisy, Eupatorium rugosum ‘Chocolate’ (joe pye weed), Fuchsia, Geum, Heuchera, Kirengeshoma palmata, Kniphofia ‘Echo Mango’, Lavender, Nepeta ‘six hills giant’ (catmint), Phygelius, Salvia garanitica ‘black and blue’, Solanum crispum

Author’s photos

Wednesday, October 30, 2019

The Making of a Garden


As the garden grows, so grows the gardener."
- Unknown

It all began with a tree. A maple to be specific. A maple from a seed my husband picked up on a walk one day and planted in a pot when he got home. After about 10 years of growth, we liberated the small tree from its pot and planted it in the grass parking strip in front of our house.

Initially I was only going to have a small circular patch cleared of grass around the trunk. Mowing and edging grass too near a tree’s trunk can cause detrimental damage to the bark layer and shorten the life of the tree so it’s always good to have a safe zone of ground cleared of grass all the way around a tree’s trunk. To create the safe zone, I did the cover-to-smother* method since I refuse to dig out turf and I didn’t want to cause damage to the tree’s surface roots by trying to remove the existing turf.

So, in 2010 I laid cardboard over the grass around the tree trunk, covered it with a thin layer of mulch and let nature (moisture, worms and soil life) do its thing, decomposing the turf, cardboard and mulch into nice aerated soil.

Sometime later in 2011(below), I decided to enlarge the area around the tree and fill it with perennials thereby reducing the amount of grass overall and so a new garden began to take shape. The bricks you see were holding down some wire panels from an old compost bin, intended to keep neighborhood animals from digging into the mulch and exposing the cardboard.


Small in its infancy, as gardens often do, it expanded over the years to come. By 2013 (below) my plants needed more room. So, I gathered more cardboard and widened the edges,


…and covered the cardboard with more mulch.


In the next photo you can see those same bricks used from the first photo to hold down the edge of the cardboard and give a neater looking delineation between the mulch and grass.


Then that same winter, I decide we need a walkway from the side walk across to the street. Yep, I lay more cardboard and topped it with 18-inch square pavers and side dressed the balance with more mulch and left it alone for the winter. It really couldn’t be easier. I didn’t try to level the pavers at this point. The next summer, once it was all decomposed underneath them, I did any leveling adjustments as needed, which were few.


In 2014 I needed more room again. As the plants grow or I add more plants, I just expand the edges to accommodate. It may be slow, but I think this is the easiest way to carve away grass footage and gain garden space and beauty. It does take some months for it to become a plant-able soil, so think in advance of buying the plants or making divisions of your own holdings. Do the smothering 6 months or more before you want to plant. Your microclimate and weather conditions will determine how fast the decomposition takes to become plant-able.


This time I used more bricks to hold down an edge. It looked better and once it was all decomposed, I removed them.


Now it’s Autumn of 2019 and I decide to get rid of this last remaining strip of grass between the garden and the sidewalk seen below. It is a nuisance to trim and the plants need more room. I could of course cut back the plants but I’d rather have less grass.

When working against a concrete edge like this sidewalk, it is important to get the cardboard tucked down an inch or so between the concrete and soil. Use a flat blade from a spade or edger to pry the turf away from the concrete edge to make it easier to tuck the cardboard in.


The goal is to completely cover the grass. If it has any light peeking through any edge it will find it and keep growing.


It is also important to overlap each piece by a few inches for the same reason. Every bit of grass must be covered so no light can get through.


I marked the locations of our underground sprinkler heads with rocks, so in the summer when it’s time to start watering again I can easily find them and carefully dig to expose them. By then the grass and cardboard should be completely or mostly decomposed and easy to poke around in.


In some of the earlier photos above you will notice the cardboard is dry. I soaked it after laying it, but before covering it with mulch. Now I prefer to soak it before laying. I soak it in a big plastic tub, but if you can’t, then you can let a sprinkler spray it for a while to wet it. I think wet card board is easier to lay and conform to the ground undulations. Wind doesn’t tend to shift wet cardboard around either before you can get a heavy mulch on top of it. But be careful not to get it too wet. Sopping wet cardboard tears easily and can be harder to get it from the tub to where you want it.


That is a large size concrete mixing tub. It held all the cardboard I needed to do this strip. I let it soak for about an hour while I gathered the tools I needed for the project. A wheelbarrow would be a great choice too.

I like to put mulch over wet cardboard rather than dry. I don’t want the dry cardboard to pull moisture from the mulch. The key here is everything needs to stay completely covered and moist, so your rainy season is good to take advantage of when timing your project.


The mulch you use can be bag-bought or your own home-made compost. I have used both, whichever I have on hand. It just needs a fairly thick layer on the cardboard so it all stays wet. You could also use wood chip. Mulch, compost, wood chip…it doesn’t really matter. Just use whatever you want the end result to be.


That thin edge of cardboard will remain showing for the winter and possibly into late winter/spring, until it falls apart. It may not look completed or beautiful for those months but it’s a tradeoff I am willing to take rather than dig turf. I could try to cover it with mulch but it will just roll off onto the sidewalk and I don’t want to have to keep sweeping it, and if I still had all those bricks, I would use them to make a nicer looking edge until it is all decomposed.


When my tree leaves begin to fall, I will cover it with them too, adding to the layers, keeping it all moist underneath.


 This is my version of working smarter not harder.
So if you’ve got grass you want to replace with a garden, consider rummaging around in cardboard recycling bins or saving your home delivery boxes. A new garden is only limited by the imagination.


*Cover-to-smother…a super important side note:
When creating a garden close to existing trees, it is critical to use compost or mulch NOT dirt or bagged soil. Dirt and soil will build up the ground level and suffocate the surface roots. Surface roots breath and absorb moisture from the ground surface. When they get buried deeply, they try to regain surface. They can circle the tree trunk and as the trunk continues to grow in circumference, it will be strangled by the root that is circling it. That is called girdling. Girdling will kill any tree. As the trunk is girdled the bark gets compressed closer and tighter to the heartwood. The cells between the heartwood and bark are how nutrients and water get transported up to the canopy and leaves. Once the bark is compressed so tightly to the heartwood, nutrients and sap cannot flow. A thin layer of cardboard, compost or mulch will decompose, keeping the soil level that the tree is used to constant. Additionally, never pile more than an inch of compost/mulch over the top of the cardboard. I see folks all around my local neighborhoods piling up bark mulch or wood chip or compost or soil in huge deep piles way high up against the trunks of their trees. See the two examples following below. This will eventually kill the tree. 


 Please never do this (see above) to any tree. Ever. When planting a potted tree, always plant it at the soil level it is in the pot. Dig your planting hole 3 times the width of the pot but no deeper than the soil level in the pot. When adding mulch never pile up more than an inch deep close to the trunk or within the drip zone. A drip zone is the circumference below the tree’s canopy marked by rain dripping off the edges of the branches, straight down.


Tree trunks have a natural flair at the base. Tree flair must be maintained for a healthy tree (above). Some trees exhibit more flair than others.


I know this is a longer post than is my usual and I am grateful you read it to the end. A few of my previous posts in this blog touch on this method of grass removal, but I have been photo-documenting the making of this garden over the years to make a more complete account. I hope this is understandable and encouraging for you to create more garden space easily. No grub hoe needed.

Any questions? Please comment below.

Thanks for reading. Cheers!

In Bloom in my Garden Today: Alyssum, Aster, Coreopsis ‘moonbeam’, Crocus, Cuphea vermillionaire, Cyclamen hederifolium, Daisy, Eupatorium rugosum ‘Chocolate’ (joe pye weed), Fuchsia, Geum, Heuchera, Kirengeshoma palmata, Kniphofia ‘Echo Mango’, Lavender, Nepeta ‘six hills giant’ (catmint), Phygelius, Salvia garanitica ‘black and blue’, Solanum crispum
Author’s photos

Saturday, May 19, 2018

Work Smarter, Not Harder - Thinking Outside the Box


Gardening is a matter of your enthusiasm holding up until your back gets used to it.  ~Author Unknown

I’ve often contemplated adding a category to my labels list about thinking outside of the box when it comes to the harder jobs of gardening. I may call it “work smarter, not harder”.

Common thought holds that when a small tree or shrub dies you must dig it out. Or if you want something to be gone you must dig it out in order to plant what you want there.

I once thought that way too. It is how I was taught. But I have done away with that absurd notion and have had 100% success in not digging anything out, whether it be tree, shrub or plant. Not even grass removal where I want a garden instead. Some things are easy to dig, so go ahead and do so if you really want to. However, when it comes to a mammoth Rosemary that has outgrown its space or has become all woody and leggy because it’s once sunny spot is now too shady due to changing light conditions as surrounding tree canopies extend. Or a lilac you carefully kept to a graceful one trunk tree rather than letting it go all multi-stemmed on you, eventually died after 4 or 5 decades, as continual sucker removal does shorten its life span. What about the rhody the previous home owner planted too close to the house, fence or walkway that is now way too big and you have come to hate it for all the maintenance it takes to keep it conformed in size. Yes indeedy, these are all my real-world experiences that have made it essential to find another way to modify a garden bed. I don’t want to dig all that out. That’s a lot of work!

Now if you’ve been following my blog for any time at all, you know I am an organic gardener. The definition of organic gardening is use the least harmful method possible, resorting to chemicals only as a last resort and in a very limited application. That is what I do, so don’t be shocked when you read on.

In each case of the aforementioned lilac, rhody, and rosemary, all of which are quite laborious to dig out by hand and since I don’t have a backhoe at my disposal, (nor would it fit into my tiny back yard) I cut them off at the lowest point of the trunk that my chainsaw can go without digging into the dirt, then carefully apply chemical herbicide to the cut and only the cut.

Oh, did I lose you at chainsaw? Understand, I am not a muscle-bound hulk by any means but power saws are pretty easy to use once you learn how. Yes, I’ve used a regular gas-powered chainsaw when the occasion warrants it (like if the diameter of the trunk is bigger than my thigh or if electricity is not nearby) but I’ve also used a small electric chain saw and I really like using a reciprocating saw (use the shortest blade possible with the largest teeth) to do the job.

I’ve also used a hand saw made for cutting woody stuff in the garden. This is not the same as a carpenter’s saw by any means. A garden hand saw has a short, usually curved, very thick blade with large teeth at opposite angles from each other. This cuts through live wood quickly and easily. If the trunk is small enough diameter you can also use loppers as in the case of the rosemary.

Whatever your method of attack is…once the cut is made and still fresh (like within a minute, so have it ready) I then use a concentrated brush killer/herbicide (yes, chemical…nasty bad business) and apply it only on the cut wood. You don’t need to mix it up in a sprayer and spray…you’ll be spreading more chemicals around than is necessary and will likely kill neighboring plants you want to keep. Just paint it on, full concentrated strength. Use a disposable paint brush or something like that, that you can throw in the trash after.

That chemical will travel down into the root. It will stay within the root/plant material. It will not travel from the root into the soil and affect nearby plants. I promise. I’ve been asked that question many times and the answer is no. My garden proves it. Never has any of my surrounding plants been affected by doing this, but if you tried to dig out the root of the tree or rhody you would tear up so many neighboring plants that you would have a mess to contend with and have to put it all back again and cross your fingers that the uprooted and replanted neighbors survive. I think it’s best to just kill it in place and save the rest of the garden.

Once the tree or shrub is down and the remaining trunk is poisoned you can plant your preferred plant(s) next to it and around it. Over the next few years the old root will decompose but the new plant will be fine and grow and spread (providing you give it proper new plant watering attention). Eventually you will be able to easily pull the decomposed stump out by hand if you want to but it will take years for that, depending on the diameter and wood type, and the other plants will be covering it anyway so you won’t see it. In the case of the rhody stump, I cut it to within an inch of the soil level and about10 years later, while I was weeding around the area, I saw chunks of the stump had decomposed fully and broke off easily. I broke it apart, which was unnecessary as the Pachysandra had covered the area completely anyway, but it was good to see the progression.

So, seeing is believing.


Peer closely. Can you see the now dead stump of the lilac surrounded by spring green leafy growth coming up all around it? Ignore the long strappy leaves of the uncontrollable Wood Hyacinth. After cutting down the tree and “painting” poison on the flat cut, I then planted a one-gallon size of Helianthus “Lemon Queen” in front of the stump. One-gallon size is about a 4"(10 cm) diameter chunk of plant. That was 2 years ago. As you can see the plant spreads by underground roots and has now surrounded the old stump.

In the next photo you can see a picture of how full the Helianthus plant is in summer. I took this photo last summer just as it was beginning to bloom. It will be fully loaded with clear yellow sunflowers by mid-summer that stay well into the fall. No unsightly stump visible.


So, there it is friends. This is not lazy gardening. It is working-smarter-not-harder so there’s more enjoyment in the garden than just plain hard work. It’s the difference between yard work and gardening.

Cheers!

In Bloom In My Garden Today: Ajuga, Bergenia, Blueberry, Brunnera macrophylla, Clematis, Dianthus, Dicentra, Geum phaeum, Hardy Geranium, Heuchera, Hyacinths, Iris, Kenilworth ivy, Lily of the Valley, Oxalis oregana ‘wintergreen’, Rhododendron,  Rosemary, Saxifraga, Solomon’s seal (Polygonatum), Tellima grandiflora, Viola

Authors photos