Showing posts with label pruning tips. Show all posts

Saturday, September 12, 2020

In the Hot Bed


Gardening requires lots of water – most of it in the form of perspiration. 

~Lou Erickson

There is a set of stairs at the back of the house dividing the sloped south facing yard into two terraced levels. This is how the beds on both sides of the stairs looked in April when we moved in. The post today is only about the left side, which is up against the foundation of the house and south facing, so it is hot and dry.


My first thoughts were that lavender and sedums would be perfect plants for this area. Once established (after next year) they wouldn’t require a lot of watering as both thrive in hot dryish areas with all day sun, and they would provide food for bees, hummingbirds and other pollinators.
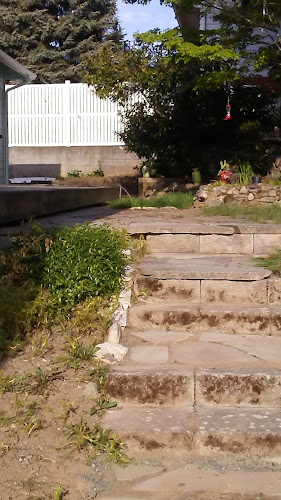
 

The only plants in that bed, aside from weeds, was a vinca tangled up with a Euonymus. The bed is just shy of 3 feet wide and 10 feet long.

Vinca is a vining, far reaching ground cover that is very ineffective at smothering out weeds and it will have to be constantly cut back if it isn’t to interfere with the walkway. It’s out.

The Euonymus is, to my taste, an uninteresting shrub that can reach out 4-6 feet wide and even taller. In this location it too would have to be pruned annually once it reached its mature size. And it would block the view of the garden I planned to create on the other side of the walk. Out it goes too.

The bed was bordered with rocks on the stair edge, presumably to stop the dirt from spilling out onto the stairs. As you can see over time the lower rocks became buried and weren’t doing the job. Lastly, there was a makeshift retaining wall made of mis-matched blocks at the bottom of the bed which had collapsed. Sorry, I didn't get a good photo of that.


All cleared away, now I have a blank slate to work with. First in goes 3 lavenders. “Goodwin Creek” to be specific. I have grown this one before and it is a favorite of mine. I love the indented leaf shape and it puts up long willowy wands of blooms which create lovely movement in the breeze. It also had a longer bloom time in my previous garden than other lavenders. It is a lovely variety. 

Along with the lavender, I added a broken portion of a Mexican pottery pot. I like using broken pots as a little interest, or whole pots turned on their side and angled just so. A little eye candy if you will.


After the lavenders are placed as the “bones” of the space, I filled in with sedums of many varieties from trailing types to hen’s and chicks types, all of which came with me from my previous garden. Sedums are incredibly easy to propagate. They will spread and fill in quickly.

As for the lost rocks edging the lowest steps, I pulled them up and re positioned them. I don’t really like rocks used that way but for now they will stay.
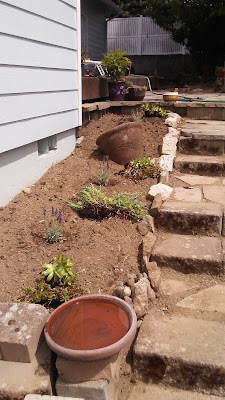
 

If all that isn’t exciting enough, now the icing on the cake happens! This is where my better half comes into his own. He is so creative and talented when it comes to hardscaping our garden spaces. He set about making a beautiful retaining wall to support the end of this bed. He used concrete blocks and capped them with flat stones. The blocks and stones had been left, stashed and buried in different places in this yard, by past owners.


First, he carved out the shape, and poured a footing in concrete.


Then cemented together blocks.


Then he ‘faced’ the blocks with a rough smear of mortar. 

He adds color powder to the mortar to give an aged look to his stucco finish. New concrete dries bright whitish and isn’t particularly lovely. The new brightness can be distracting in the garden, I think. Concrete does darken over time but it takes years. He ‘ages’ it by darkening it with coloring agents so the new wall looks like it’s been there for a long time and it blends better in the garden. I love the rough look of a stucco finish. It transports me to Tuscany or south of the border.


Then he capped it all off with some slate or what ever this stone is. There were several pieces of this stone laying around, apparently left-overs from the construction of the patio some years ago. I am so glad to have them as they are just perfect to finish this wall.


So… what do you think? Coming along nicely, I think. In a year or two you won’t see much, if any, soil after these plants fill in. Covered soil means less weeds. Win Win.

Cheers!

In Bloom in my Garden Today: Rose, Sedum, Agastache, Geum, Fuchsia, Salvia, Verbena, Gladiolus, Mullen, Thyme, Oregano, Calendula, Yarrow, Dianthus, Germander, Cuphea,

Author’s photos

Tuesday, July 7, 2020

Moving Rocks


What we learn with pleasure we never forget.
~Alfred Mercier

  
This triangular shaped bed contained an ornamental plum which was way too big of a tree choice to be planted in a space of this size. Before we moved in it had been pruned on two sides to keep it away from the house and gutters. That made it grow vertical sprouts over 2/3s of its canopy and normal outward branches on the side that didn’t get pruned. The unpruned side became heavy and was the leeward side so wind could potentially topple this tree. I decided early on it would have to come out.

The bed also contained Helleborus, Sedum, and Ajuga reptans. Being adjacent to a walkway the Ajuga had to be relocated. Anytime you plant near a sidewalk you will be happier if you don’t choose plants that have a far-reaching habit. Ajuga is great for carpeting large areas quickly but here it was in a pretty confined space. It spreads by reaching out in all directions with new stem growth that roots when it touches the soil. At a sidewalk it will quickly overrun it’s borders and you will have created more work for yourself because you will have to keep cutting it back.

As for the tree, I had a tree service come cut the tree down. It is fine to leave the stump in this case, as I can plant around it and it will rot in time. I am not a fan of chemical use but to leave a stump in place to rot over time, you may have to apply a chemical to the freshly cut stump to stop it from re-sprouting. It depends on what type of tree it is. Here I used a chemical herbicide on the cut end only. Minimal use.


Then I took out all the Helleborus and Ajuga in that bed. Being a shade loving plant, I relocated some of the Helleborus to a shadier spot, since the tree was providing shade in that bed. The majority of them I gave away to neighbors.


The bed was edged with large rocks on all three sides. It is a slightly raised bed toward the middle where the tree trunk was. The rock placement didn’t really do anything for the bed. I kept tripping on some because they lined the walkways on two sides and stepping on others near the water faucet, so I pulled them all out and set them aside in a pile. In so doing I was surprised to find they were lava rock and super lightweight.

As I was contemplating how to plant my now empty and raked bed with the stump in the middle, the word “outcropping” kept coming to mind.

So, that’s what I did.


I started by planting those lava rocks. Outcropping also creates little pockets that stabilize slopes and hold water better for your plants. Whenever you use rocks in the landscape, they should be buried up to 1/3 deep so they look natural. You “plant” your rocks, don’t just lay them on top.

Then I added in some plant divisions from my former garden, and a couple of new plants, one that I purchased and one that was a gift from our realtor and friend Gina . Best. Realtor. Ever!

Last but not least I topped it all off with a clay pot, which I balanced on top of the stump with soil and rocks. Can’t even see the stump now and it will rot over time.


What do you think? I’m pretty happy with how it turned out. Now I need to go shopping for a vine maple which I will plant behind the pot for some vertical interest, fall color and will provide annual leaf mulch. Even at a mature size, a vine maple is a good choice for this space and it won’t require pruning to keep in confined.


And if you are lucky enough to find a fantastic tree guy as I did, he won’t roll his eyes when you ask if it would be too much to ask him to cut some of the trunk into stepping stone size thickness for your use in other parts of the garden. Well it never hurts to ask, right?
Thanks Rich at Signature Tree Service !   You made my day!

 In Bloom in My Garden Today: Cuphea Vermillionaire, Lobelia laxifolia, Gillenia, Yarrow, Potentilla, Sedum, Oregano, Daisy, Rose, Thyme, Dianthus, Nepeta

Authors photos

Wednesday, March 6, 2019

A New Toy


You know you’re a real gardener when you think compost is a fascinating subject. ~Author unknown
  
I love dirt! I love making beautiful, sweetly aromatic compost and spreading it around the garden. I love raking Autumn leaves onto the garden beds, knowing they will protect roots from winter’s cold and keep spring’s weeds from growing. I love composting my garden trimmings, recycling them back into my soil. I love making my own ‘fertilizer’ since compost feeds the soil which in turn feeds plants. Making my own compost with trimmings (selectively of course) from my own garden protects me from buying chemicals, pathogens or weed seeds that can come with bagged store-bought compost. From piles on the ground to enclosed tumblers (which discourage rodents from living in the warmth of a compost pile) there are many ways to make and contain your pile of trimmings as it breaks down.

The healthiest gardens have dirt that is living. Living dirt is supportive of and alive with the organisms (worms, centipedes, pillbugs, earwigs, microbes, fungi and yes… even slugs) that breakdown organic matter (leaves, sticks, twigs, flower petals) making nutrients available to plants roots. If your garden can match what goes on naturally in the woods, it will be healthier. In the forest the soil is never bare. It is always covered, year-round by the decomposing debris that falls from the trees. Fallen branches, leaves and needles cover the earth and begin to decay. Decaying stumps are important too. Here in my Pacific Northwest timberlands there is a native species of huckleberry that prefers decaying stumps in which to germinate its seeds and take root.

Healthy dirt makes gardening easier and more rewarding. Healthy dirt produces healthy plants. That’s a win/win in my book, so it’s no surprise that I attended a seminar on soil science recently. While much of it I already practice, there is always something new to learn, right?

There was lot of valuable information in this seminar but my biggest take away was this, the value of wood chip as a mulch. Wood chip is not the same as beauty bark, which is just bark. Wood chip contains all parts of the tree or shrub and makes a valuable coarse mulch rich in nutrition.  


Coarse mulches allow water and air to move through it so as not to smother the soil or its living organisms below. I always knew wood chip was a good thing. Even better that arborists look for gardeners to give it away free to but a 20-yard pile of wood chip is more than I can use on my little 5000 square foot piece of property in a single season. But if you can use 20 yards or can share with neighbors and friends, a great source is chipdrop.com. Be sure to read all the information including the “expectations” page. It is a free service to recipients but understand that the arborists pay for the service so a nominal payment to reimburse the arborist is only fair. After all, $20 USD for a huge load of wood chip is nothing compared to buying bagged mulch and they deliver it right to your designated location.

At the end of the seminar one of the speakers briefly mentioned as a side note that she has a chipper, a small electric chipper. I’ve wanted a chipper for several years but I don’t have much room to store one out of the weather, nor do I want to fiddle with a gas-powered engine. So, my woody trimmings, too thick to chop up by hand, go into the collection bin that the city picks up. Did she say “small electric chipper”? Hmmm. It would sure be nice to have one. Now I am really interested! When I got home, I started looking online for used sources and found 5 right away! All the same type that is no longer being manufactured and in varying degrees of condition from looks-kinda-rusty to looks-pretty-darn-good.

Soooo….fast forward a week. I am now the delighted owner of my very own electric, 14-amp, 120 volt, 3300 rpm, capable of chipping 1½” diameter branches McCulloch garden shredder! Woohoo!! I’ve been gardening since I was about 5 years old. How is it I’ve never had one of these yet?
  
Turns out there much to learn about my new toy. McCulloch was made in the USA however, this chipper is no longer manufactured, and similar designs are now made overseas so finding replacement parts may be a challenge. I did discover a great source of info on http://www.robsplants.com/chippy.php. Read down through the comments section of his blog post…it covers conversations by owners of this chipper (affectionately named Chippy) as they navigate the replacement parts journey. Turns out parts are becoming available but they are made in China of possibly poorer quality materials so may wear out more often.

Since I bought it used, I figured the blades would need sharpening. There are four blades to keep sharp. Two comprise the upright one-piece “V” blade and then there are two individual horizontal blades which are reversible, extending their life two-fold. I read several opinions about sharpening vs. replacing blades on Rob’s site above but I decided to try sharpening. I just did a light job of it with a couple of files. It cut through my pile almost like butter. I had a lot of green material so the exit chute plugged once. Then twice I pushed dry material through too hard and fast so it jammed. Clearing a jam requires unplugging it and exposing the blades which is not difficult but takes time away from the work so I think a good rule of thumb is every time I have the cover off, I will also give it a quick sharpening. Sharp blades do the work so I don’t have to and most professional gardeners sharpen the blades of what ever they are using after every job or throughout the job. With more practice I hopefully won’t get a blade jam or plugged chute too often.


 There is so much to learn about composting, soil science and the right and wrong way to apply mulch. I’ve long advocated for naturally feeding the soil with compost and protecting the bio diversity of soil life by not using chemical fertilizers, chemical pesticides, or beauty bark. In the archives, under the compost label on this blog you can find 5 more articles that I’ve written on the subject. If you find compost, mulch and dirt as interesting as I do, I hope you will enjoy my other articles. I have provided additional resources below so you can educate yourself to your own degree of interest. These links provide answers to questions and debunk myths that circle around the use of woody mulch. I encourage you to read through them.

Thanks for reading!

For more information see…
gardening.wsu.edu
getchipdrop.com/expectations/

Another great source for all things garden is…
gardenprofessors .com and 
The Garden Professors page on Facebook is a collaboration of Horticultural Professors from around the USA


In bloom in my garden today: Crocus, Cyclamen coum, Hellebore, Sarcococca confusa, Viola,

Author’s photos


Wednesday, September 18, 2013

Apiary Update


For bees, the flower is the fountain of life. For flowers, the bee is the messenger of love.
~Kahlil Gibran
 
I am sad to report that my bees have all died this year. We did our utmost to keep the hive alive this spring. I could see that it was failing and that the queen had disappeared so we inserted a few frames with new eggs and some brood from a strong hive so they could make their own queen, which they did, but within a few months it had completely died. Not sure why but such is the way of beekeeping in these difficult and troubling times for the bees.

Happily there are several beekeepers within blocks of my urban home and their bees are going to town these sunny days on my Silver Vein Creeper (Parthenocissus henryana), packing full the pollen sacks on their legs.


I planted this vine years ago to camouflage an otherwise boring fence and I’ve been so happy with it. It grows to 10 feet long (3 meters) so it nicely covers a 6 foot (1.8m) fence, draping gracefully over the other side as seen above.

 
The leaves are a silver-veined green turning a lovely apricot in the fall. A perfect backdrop to the fall blooming and fragrant Gladiolus callianthus (formerly Acidanthera). While in the photo above the background of these leaves is in fuzzy focus, you can get an idea of the colors.

 
The vine's flowers are considered ‘insignificant’ in the gardening world, which just means they are so small they are hardly visible, but for the bees they pack a wallop in the pollen department. In the above photo is an opened flower, pollen exposed. Below you can see the vines are covered with flower buds, just a tad bigger than a pinhead.

 
This is neither a messy vine nor a thug by any means. It is deciduous, so the leaves drop off for the winter, making great mulch and providing easy access to the vines to prune and control as you please in late winter, early spring. This is when I thin it out and corral its growth. It can take sun to part shade and is hardy to USDA zone 4. It is self attaching, meaning it puts out little tendrils which find a flat surface then stick to it with little round pads, like frogs ‘toes’, if you will. These tendrils will also curl around a wire support if you choose to use a trellis.

Overall a very easy and versatile vine. I highly recommend it, especially for the bees!

In Bloom In My Garden Today: Alyssum, Begonia ‘bonfire’, Caryopteris ‘longwood blue’ (bluebeard), Cimicifuga simplex ‘brunette’, Coreopsis ‘moonbeam’, Cyclamen, Daisy(white double), Daphne caucasica ‘Eternal Fragrance’, Echinacea pallida, Echinacea purpurea magnus, Fuchsia, Gaillardia (blanket flower), Gladiolus callianthus (formerly Acidanthera), Kirengeshoma palmata, Kniphofia ‘echo mango’Mullen chaixii ‘Album’, Nepeta ‘six hills giant’ (catmint), Perovskia ‘little spire’, Phygelius ‘new sensation’ (cape fushia), Rose, Salvia, Star Jasmine (trachelospermum jasminoides), Tomato

Authors photos

Monday, September 9, 2013

Junipers - What's Not to Love?

A gardener learns more in the mistakes than in the successes.
~Barbara Dodge Borland, 1904-1991, American author


Actually there’s a lot not to love about Junipers in my opinion but then I had an unpleasant domestic relationship with them years ago and still shudder at the remembrance.
 
 
Junipers can grow in a wide variety of situations and locations. This is not the reason to plant one. They can also be indestructible. This is not a reason to plant one either.


With all due respect…..Junipers are not meant to be planted at sidewalks

 
or next to stairs where you have to carve out a corridor.


or at the edge of lawns.


Junipers are not meant to be hedging material, carved into hard blocks...


or soft undulating waves. If you have to prune any plant this severely in order to keep it within boundaries then you have the wrong plant in that spot.


Junipers need room to spread and breathe...


allowing them to take on their natural sprawling habit with graceful branches reaching luxuriously in freedom.
 
 
All of the above can be applied to Heathers and Heaths too.
Exposed, woody stems due to over pruning is just plain ugly.
 
 
Now that’s what I’m talking about! No ugly stems showing, just a blooming delight! Gorgeous.
 

The moral of the story is…if you are going to plant something, always choose the right plant for the right place and you will be rewarded with beauty and less work.

In Bloom In My Garden Today: Alyssum, Begonia ‘bonfire’, Caryopteris ‘longwood blue’ (bluebeard), Cimicifuga simplex ‘brunette’, Coreopsis ‘moonbeam’, Cyclamen, Daisy(white double), Daphne caucasica ‘Eternal Fragrance’, Echinacea pallida, Echinacea purpurea magnus, Fuchsia, Gaillardia (blanket flower), Gladiolus callianthus (formerly Acidanthera), Kirengeshoma palmata, Kniphofia ‘echo mango’Mullen chaixii ‘Album’, Nepeta ‘six hills giant’ (catmint), Perovskia ‘little spire’, Phygelius ‘new sensation’ (cape fushia), Rose, Salvia, Star Jasmine (trachelospermum jasminoides), Tomato
 
Authors photos

Wednesday, June 13, 2012

Sometimes The Garden Must Wait


In June as many as a dozen species may burst their buds on a single day. No man can heed all of these anniversaries; no man can ignore all of them." 
~Aldo Leopold (American ecologist, 1887-1948)

It’s June and by now the lilacs are finished blooming here in the Pacific Northwest.  I have 3 medium sized trees and by now I would normally have been up on a ladder amongst the branches cutting off all the old bloom clusters before they form seed heads.  It makes them not only look considerably better, it also sends the plants energy into new growth sooner rather than giving it over to seed formation.

I won’t be doing that this year though.  The pace of my schedule has ramped up this year and some tasks of the garden simply must be left undone.  Ignoring some garden jobs can cause untold disaster, like letting weeds get out of control.  That I won’t allow, but skipping the lilacs doesn’t worry me.  Leaving the seed heads will not affect the tree’s blooming performance next year.  What it will do is provide food for birds during winter’s dearth and that’s a good thing.  A neighboring garden has a beautiful double flowering white lilac tree.  It is far too big to teeter on a ladder to clean it up so it is never dead-headed.  And because of that, every winter on the bleak gray days, I smile as I watch the Chickadees feast on every last morsel offered by that tree.  This winter they’ll have more with my trees adding to their buffet. 


In Bloom in My Garden Today: Alpine Strawberries, Armeria, Baptisia, Bletilla pink, Blueberries, Chives, Columbine, Daylily, Daphne caucasica ‘Eternal Fragrance’, Dianthus, Gaillardia (blanket flower), Hardy Geranium, Hosta ‘sum and substance’, Huchera, Kniphofia (torch flower or red hot poker, Nepeta ‘six hills giant’ (catmint), Peas, Peony, Phygelius ‘new sensation’ (cape fushia), Primrose vailii, Rose, Salvia, Saxifraga andrewsii (irish saxifrage), Sedum, Schizostylis ‘watermelon’, Thalictrum rochebrunianum (meadow rue), Tomato,

Author’s photos


Friday, April 20, 2012

Garden Tool Care


"To dig in one's own earth, with one's own spade, does life hold anything better?"
  ~Beverly Nichols, 1898-1982, British author of
Down the Garden Path

As in any endeavor or hobby, having the right equipment in good condition makes the difference between enjoying your activity or not.

The winter months are the perfect time to get your tools cleaned and sharpened for the season ahead.  In a perfect world I’d be doing this in January, not mid April but alas…such is life, isn’t it…the best laid plans and all that? 

Imagine this, a steaming cup of your favorite beverage, jazzy tunes on the radio, all in your large garden shed complete with wood burning stove to keep you warm while the winds howl and snow swirls outside and you, cleaning, oiling, and sharpening your myriad of garden tools all neatly stowed on their proper wall hooks or in their tidy drawers…yeah I wish.  Something to aspire for but my reality is this.

No room for a wood stove but I do have the jazzy tunes going.  One wall gets all my larger tools in our little drafty garage.  A few drawers get the smaller trowels and weeding forks.  All this shared with piles of pots, bags of fertilizer, bee stuff, car stuff, bikes, oh and a car, which is why we have a Mini Cooper.  Crazy tight but it all shoe-horns in somehow.

Believe it or not, gardening tools are meant to be sharp.  Just as a dull kitchen knife makes chopping and slicing more difficult, so does a dull shovel make digging more strenuous. 

Naturally digging in the dirt, rocks and grit will dull your shovel, making you work harder.  The more you dig the more you may need to sharpen the edge.  In the case of pruners (secateurs) you could sharpen them after each full day of use or more likely on a monthly basis.  Sharpening frequency depends on how often you use the tool.  Once sharpened you should feel the difference.

Mostly people ask what edge gets sharpened?  If your new tool comes with a sharpened factory bevel right out of the package, take note of which edge and the angle of the bevel and only sharpen in the same way when you sharpen it again.  The angle of bevel will determine how sharp the tool is.  The more delicate pruner will have a sharper bevel angle than a shovel.   Also the sharper the angle the more often it will require sharpening.  A shovel is typically at a 45 degree angle on the top side of the edge.  A good average bevel for a hoe is at about 30 degrees, again on the top side of the edge. 

This is my stirrup (aka wiggle) hoe, my favorite tool for the weeding of large areas or mixing in compost or fertilizer at the soil surface.  (All organic fertilizers must be lightly mixed with your soil in order for the soil organisms to break down the fertilizer, making it available to the plants).  With a push/pull motion this hoe is designed to skim across, just under the top layer of dirt, slicing the leaves off from the stem or root of weeds.  Mine was not sharp at the point of purchase but in order for ease of use they need to be sharpened on both top edges of the flat, horizontal blade.  This one actually had blunt, squared edges so I used an electric bench grinder to get it to sharp edges.  Now that I have two beveled edges, I can just use a hand file to do the job.

I’ve tried several different ways to sharpen tools over the years.  The electric bench grinder is good for shovels and hoes.  You can get different stone grits, depending on how dull or nicked the blade is you need to sharpen, though a flat file will work well if it’s not in too bad of shape.  


For more delicate work like pruners I prefer this pocket size Corona tool.  Taking apart pruners is good practice once a year so you can really clean all the metal surfaces with steel wool and sharpen the full length of the blade.  But for the monthly touch up, I want a quick tool like the Corona tool. This is not a paid endorsement or any kind of endorsement other than I like it for its ease and pocket size.  I discovered this little handy sharpener at the greenhouse were I volunteer.  They keep several of them around.  Sharp pruners are a must.  Dull cutting edges will tear leaves and stems.  You always want a nice clean cut, otherwise pests and/or disease can enter the plants vascular system with the potential of death.  Additionally, a dull hand pruner will put added stress on your hands and wrists.


The long file shown below is too clumsy for me to use on small pruners.  The circular stone, which is inserted into a drill like a drill bit, works great but you need to take apart the pruner to get all the blade’s edge.  It works great for grass shears and the standard flat hoe. 

Don’t forget to lubricate the moving parts of your tools to keep them working well.  My favorite lubricant is a Teflon based synthetic oil lubricant, found at bicycling stores made for bike chains.  It’s slick and doesn’t attract grit.

The wooden handles need care too.  Barehanded, I rub the wooden handles of all my tools with linseed oil.  It is a natural, non toxic oil which smells wonderful.  Once it absorbs it protects the wood from drying out and leaves a nice feeling finish that water won’t penetrate.   In the kitchen linseed oil is known as flax seed oil.  The difference being the linseed oil at the hardware store is not strained enough or processed for consumption.

I prefer wooden handles for most of my tools, but I must confess to breaking two garden forks with wooden handles so for that particular tool I keep to the fiberglass handle.  One thing to note…if you live in the USA and can get to a Sears store, they still offer the life-time guarantee on their entire line of Sears Craftsman brand tools…that includes gardening tools.  I’ve broken a few wooden handles in my work and yes, I do take advantage of that guarantee.  Buying and replacing cheap brands is not frugal when you can get free replacement and a quality product.  You don’t need to keep receipts…Sears Craftsman tools have their brand name stamped on the handles.  (No endorsement here either, just good information)

Lastly, do your best to hose the dirt off your tools and let them air dry before you stow them away after use.  Rusty tools are long-lived tools. So sharpen your tools now and have a more enjoyable time in the garden this summer!

In bloom in my garden today: Alpine Strawberries, Anemone nemerosa ‘robinsoniana’, Bergenia ‘winter glow’, Brunnera macrophylla, Clematis alpina ‘jacquelin de pre’, Daphne caucasica, Daffodils, Clematis alpina ‘frankie’, Erythronium revolutum (fawn lily, trout lily, dogtooth violet), Fritillaria pallidiflora, Geranium phaeum ‘lily lovell’ (mourning widow), Hardy Geranium, Heather(Erica carnea ‘springwood white’), Hellebore, Hyacinth ‘blue jacket’,Kale, Pansy, Skimmia, Primrose (double English), Tulipa ‘gavota’

Authors photos

Thursday, April 21, 2011

Taming the Vine

A doctor can bury his mistakes but an architect can only advise his clients to plant vines.
~Frank Lloyd Wright

Vines are a great way to cover an eye sore or add vertical plant interest to a small garden. Just about every garden has something ugly or boring that could be covered with a lovely vine. A dull fence, a neighboring garage that you’d rather not see or perhaps you’d like to add an arbor over your gate.

Are you afraid of vines after having seen a wisteria or English Ivy (Hedera helix) swallow up someone’s house? Not all vines are rampant thugs nor do they have to take over the house. I am going to describe how I prune 3 of my vines, Solanum, Wisteria and Fuchsia in my yard. This will be general pruning advice for many (not all) woody, deciduous, perennial vines.


The above picture is of a Solanum crispum glasnerium (Blue Potato Vine) taken in late summer. The trellis it is on is 16 feet (5.2 m) long and 7 feet (2.1m) tall. As you can see the plant covers it and rises several feet above it. In my locale it is in perpetual bloom from May well into December. Only our coldest sustained deep freeze will stop the blooms and make the leaves fall. It is a fast grower with no pest problems that I’ve experienced. After you initially train the twining branches where you want them, it is no work at all aside from annual pruning. Hummingbirds love it and I see the squirrels eat the green and orange berries in winter. I’ve had two of these vines. Only once, on a previous vine did I see sucker growth coming up a foot away from the plant. I’ve never had suckering from the second vine. It may or may not be a problem for you.


Above is the same vine after I prune it in March. Initially I tied the young pliable vines to a fence or trellis where I wanted them to grow and thicken. It blooms on new wood, so every year when you prune you will keep only those branches that will create a main framework for you. All the rest, prune out.


Next is my wisteria vine, trained into a ‘standard’. The photo above is in bloom, below is pruned prior to blooming.  Twenty five years ago when we bought this house it was climbing over the roof, into the siding and about to swallow the back stoop. It is not self supporting. The trunk would have to be much thicker, so I have it supported by a cut willow branch. Wisteria is a bit trickier to prune. They bloom on old wood. The leaf buds come out at the same time as the flower buds. The flower buds will begin to elongate with a scale-ly appearance, while the leaf buds will stay tightly closed. Only then do I prune the wisteria, if it needs it, so I can tell if I am about to cut off flower buds. If your wisteria is really a big mess, you may have to sacrifice flower buds for a year to get it back into shape.


If you don’t like to putter in the garden on a weekly basis do not plant a wisteria. While this type of pruning easily keeps it to a manageable size and shape, it sends out new tendrils all throughout the summer that will quickly turn it into a mess. Be prepared to cut them off weekly to keep ahead of it.

Here’s a great example of another pruned wisteria. The main framework of it is trained along the front porch and around the side of this house. All the rest is removed each spring.


The wisteria below is out of control, reaching into the gutters and under the siding. It could be cleaned up and pruned the same as the one pictured above.


Next is my Fuchsia magellanica ‘hawkhead’ after pruning. A gorgeous fuchsia with a small lavender flower which the hummingbirds love. Left alone it will be a bushy shrub, but you can form it into an upright small tree. It took a few years to get it this big (over 6 feet/1.8m) and for the vines to thicken where I wanted them. When it’s in full leaf and flower, it covers the whole area. It is not self supporting. I use green flexible tie ‘tape’ to keep the main stems tied to the support which is an aluminum fence post, cemented in and painted black. I cut all the small branchlettes off the main network of branches in March or when I see new green leaf growth emerging.


• The time to prune your woody vine is when it is dormant but about to break dormancy or just as it is breaking dormancy. If it is still dormant there will be no leaves or buds opening. The leaf buds may be ‘swelling’, getting ready to ‘break’ but no color green is yet showing. The hardest time to prune is when it’s fully leafed out. It is really hard to see you’re progress with all those leaves in the way. In my region, late winter early spring is the best time to prune deciduous, woody vines.

• You need to know if the vine you are buying blooms on ‘old wood or new wood’. It is an important question to ask at the nursery. Wisterias, for example, bloom on old wood meaning they set their flower buds the previous summer and if you prune too hard you’ll cut off those flower buds. The buds will not necessarily be visible to you but they have formed in the stem nonetheless. A climbing rose on the other hand blooms on new wood so you can prune those in the spring with no fear of cutting off this year’s blooms. They set their flower buds on the new growth. I prune climbing roses the same as the Solanum. Leave the long, main arching canes, trim off the small stuff and cut out any dead canes.

• When you are cutting, think framework. Naturally, you’ll cut to a smaller overall size than you want the plant to be when in full leaf/flower. It may take you a few years of pruning to gauge that, as you prune and see how big it becomes when leafed out.

• When you are vine shopping from a reputable nursery, ask for pruning advice from the nursery staff and ask how ‘vigorous’ the vine is you are considering. The term vigorous on a plant tag is the grower’s cheeky way to get you to buy what is possibly a thug, plant or vine. Vigorous often translates to invasive. Yes, really. Ask a lot of questions before you buy, and if the staff can’t answer, find another nursery. In my region, early to mid May is often when nurseries offer vines at sale prices.

As I mentioned above, this advice is for some vines. Not all can be pruned this way. Clematis vines for example, depending on the type of Clematis you have, it can either be cut down to the ground or must not be pruned at all, except to remove dead stems. It’s best to ask the nursery personnel for specifics regarding what you are buying.

A very important post script. If you live and garden in the USA, please do not buy, plant, or even consider English Ivy (Hedera helix). On parts of the west coast Hedera helix is listed on the noxious weed register and now illegal for many (but not enough) nurseries to sell. The seeds are spread via air mail, courtesy of soaring birds. They are fast growers and hardy, quickly climbing over anything. It is smothering and choking out our native woodland shrubs. Not only does it grow up those pretty stone and brick estate mansions, it grows up our forest’s trees and can girdle them, which kills them. There are many grass-roots organizations spearheading its eradication in our forests, woodlands and wetlands, but they are a drop in the bucket of what’s needed. The mature, waxy leaves repel even the most deadly herbicidal sprays. It is best battled by hand. If a gardening ‘expert’ tells you to plant English Ivy for soil erosion control…find another ‘expert’ for a more educated solution. There are many, many better options, specific for your region. Please do not settle on English Ivy.

In Bloom In My Garden Today: Daphne caucasica 'Eternal Fragrance', Anemone nemerosa 'robinsoniana', brunnera macdrophylla, Mahonia, Corylopsis veitch (Winter Hazel), Rhododendrons, Clematis, Muscari (Grape Hyacinths), Hyacinths, Tulipa turkistanica, Hepatica, Daffodil, primrose (double English), Heleborus, Bellis perennis (English daisy), violet primrose


Author’s photos