Showing posts with label compost. Show all posts

Tuesday, June 30, 2020

Grass, Grass and More Grass


“Think back to the first time you explained to a nongardener that the lawn is just the place you stand when looking at your plants”
~ Steve Aitken, editor of Taunton’s Fine Gardening magazine

This place has a ton of lawn space. There is a huge strip of grass along the street, and being a corner lot, it wraps around the corner and goes partway up the perpendicular street. Then there is an upper strip along the front of the house. Then there is more on the east side of the house that wraps around the back and extends partway along the south side.

I like some grass in the landscape but for us, that is way too much to maintain and mow. Currently my better half and I share the mowing and grass maintenance jobs and neither of us want it to be more than a 30 minute endeavor. I, personally would rather spend my time gardening, or hiking, kayaking, going on long walks, not tending grass. However we both want to do the mowing as part of our outdoor exercise which is why we don’t hire it out. Mowing grass is a good cardio workout in the fresh air in the sun. But 30 min or less mowing is plenty of that particular activity. And it is easier to keep a properly mulched garden watered and weed free than acres of grass.

So, one of my first priorities, after getting control of the weeds in the garden spaces and grass, was to lessen the overall amount of grass. As you have read in previous posts on my blog I have had good results in smothering grass with cardboard topped with mulch or dirt. I will be doing that again in the back and side yard as you will see later, but this street side grass is too monstrous an area to lay cardboard and paying for yards of compost would be much too costly.


So, I decided to use wood chip. Not beauty bark. Wood chip. You can read my reasons why here, but for now suffice to say ‘free’ is my kind of price. I did pay an arborist his asking price for these first 12 yards because I wanted it now, he had it now, and I wanted him to drive and dump it along the street up on the grass in a stripe as long as he could get it. Not all arborists give it away free but many do.


I didn’t want to come home to find a tall pile dumped all in one heap and in the wrong place so I was getting picky and there are times you have to pay to get things your way. Subsequent chip loads I am getting free from other local tree trimming service companies to finish the job, since 12 yards wasn’t enough and I need to thicken the layer. I tried to rake it out to 6-8 inches thick but being such a large chunky medium, grass in some areas is finding the light and pushing its way up. That happens when cardboard isn’t used underneath your mulch. Mulch or dirt over cardboard doesn’t have to be so thick as the card board does the job of cutting off all the light. Chip takes a bit more supervision to get the job done. But in the end, it will work and, in the fall, or late winter it will be ready for my planting ideas.
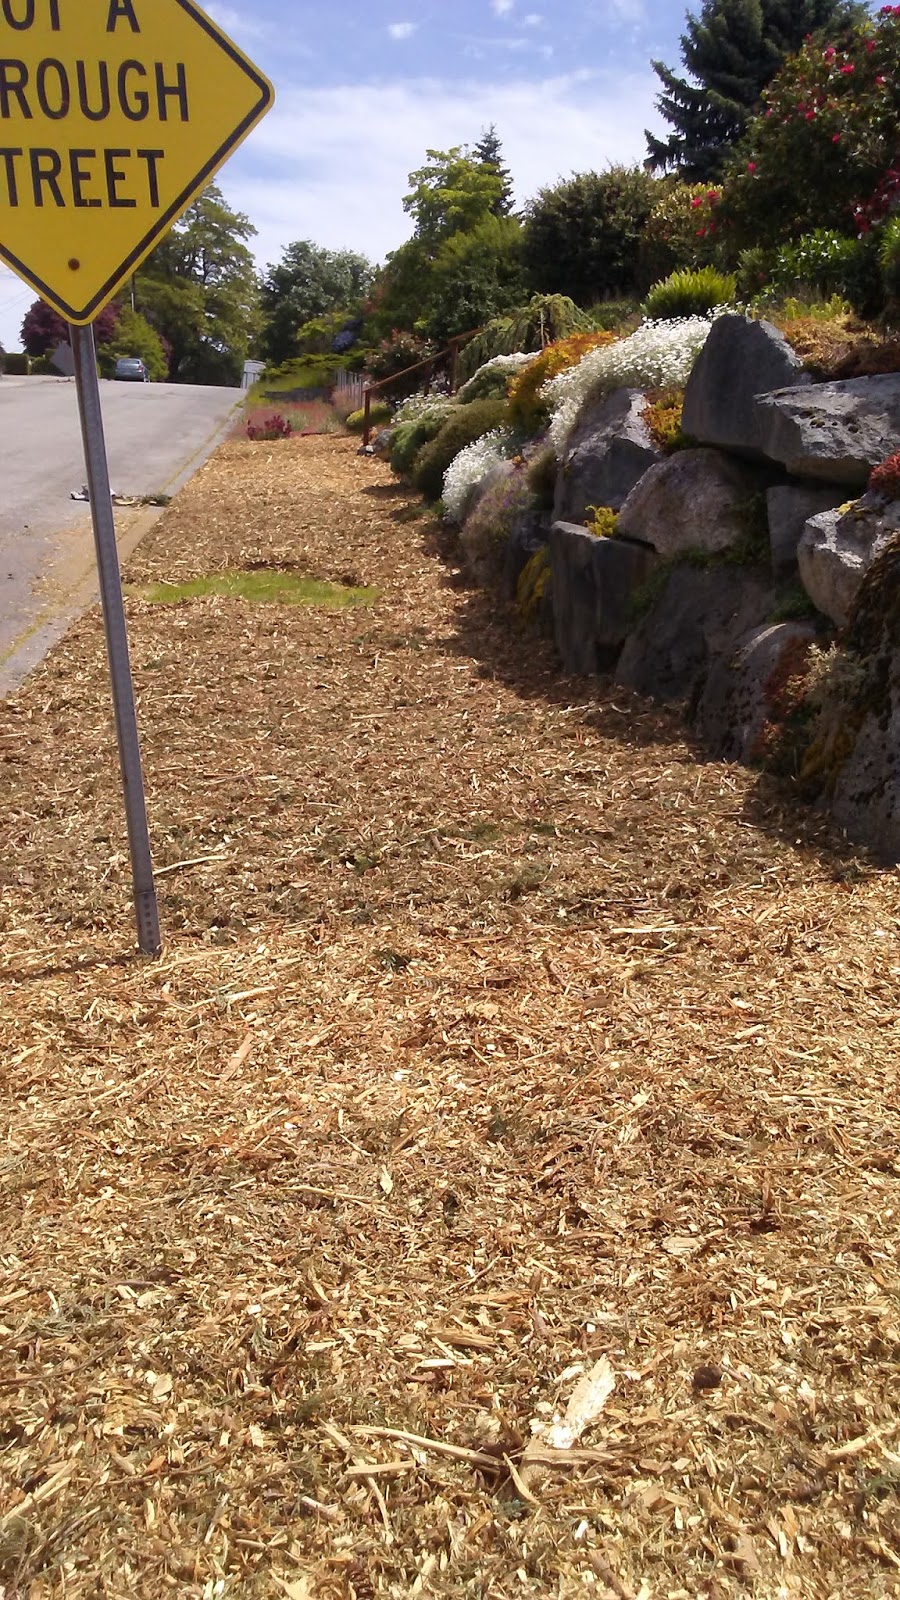


It took me 2 days, 6 hours each to rake all this out and wheelbarrow it around  from the main drop. And yes, I mean me, moi, by myself. I don’t often ask my better half for help doing this kind of stuff even though he is willing. The garden is my love and joy, the easy parts and the hard parts. If I can’t do the work I need to come up with a different hobby. I will give credit to where credit is due when I do ask for help, but for the most part all the work you see in my posts I have done myself unless otherwise specified.


I am toying with planting options right now. I want to plant low growing shrubs so as not to cover the beautiful rockery. Viburnum Davidii, St John’s Wort (shrubs not ground cover), Burning Bush (Euonymus compacta), Spirea, Daphne ‘Eternal Fragrance’ among others are making the list. In a few years’ time when they begin to fill in I will no doubt give you a before and after post of that area again.

And the very next day, literally barely 12 hours later, the gas company decided to do work in the area and found my lovely property the perfect place to lay their pipes as a staging area! Arrgh!!! They walked all over it, churning up the chip layer and generally messing up much of my hard work. My fear was if they churned it up it would be thinner is some areas and the grass would get through.


I did, nicely, explain how I had just finished raking all that out and my reasons for doing it and asked them please be careful. Happily, they removed their stuff and attempted to smooth it out but some damage had been done. Sigh. The churned-up areas did allow light to reach the grass under and it had started to poke up through. My next load was a finer consistency, so it compacted better to suppress the light. I piled more where I needed it. Now I can leave it all to rest and get onto other parts of the garden.

In Bloom in My Garden Today: Hebe, Shasta daisy, Cuphea “Vermillionaire”, Calendula, Rose, Hydrangea, Veronica, Dianthus, Nepeta, Gillenia, Sedum, Bletilla, Potentilla, Oriental Lily, Digitalis, Salvia,

Author’s photos


Wednesday, October 30, 2019

The Making of a Garden


As the garden grows, so grows the gardener."
- Unknown

It all began with a tree. A maple to be specific. A maple from a seed my husband picked up on a walk one day and planted in a pot when he got home. After about 10 years of growth, we liberated the small tree from its pot and planted it in the grass parking strip in front of our house.

Initially I was only going to have a small circular patch cleared of grass around the trunk. Mowing and edging grass too near a tree’s trunk can cause detrimental damage to the bark layer and shorten the life of the tree so it’s always good to have a safe zone of ground cleared of grass all the way around a tree’s trunk. To create the safe zone, I did the cover-to-smother* method since I refuse to dig out turf and I didn’t want to cause damage to the tree’s surface roots by trying to remove the existing turf.

So, in 2010 I laid cardboard over the grass around the tree trunk, covered it with a thin layer of mulch and let nature (moisture, worms and soil life) do its thing, decomposing the turf, cardboard and mulch into nice aerated soil.

Sometime later in 2011(below), I decided to enlarge the area around the tree and fill it with perennials thereby reducing the amount of grass overall and so a new garden began to take shape. The bricks you see were holding down some wire panels from an old compost bin, intended to keep neighborhood animals from digging into the mulch and exposing the cardboard.


Small in its infancy, as gardens often do, it expanded over the years to come. By 2013 (below) my plants needed more room. So, I gathered more cardboard and widened the edges,


…and covered the cardboard with more mulch.


In the next photo you can see those same bricks used from the first photo to hold down the edge of the cardboard and give a neater looking delineation between the mulch and grass.


Then that same winter, I decide we need a walkway from the side walk across to the street. Yep, I lay more cardboard and topped it with 18-inch square pavers and side dressed the balance with more mulch and left it alone for the winter. It really couldn’t be easier. I didn’t try to level the pavers at this point. The next summer, once it was all decomposed underneath them, I did any leveling adjustments as needed, which were few.


In 2014 I needed more room again. As the plants grow or I add more plants, I just expand the edges to accommodate. It may be slow, but I think this is the easiest way to carve away grass footage and gain garden space and beauty. It does take some months for it to become a plant-able soil, so think in advance of buying the plants or making divisions of your own holdings. Do the smothering 6 months or more before you want to plant. Your microclimate and weather conditions will determine how fast the decomposition takes to become plant-able.


This time I used more bricks to hold down an edge. It looked better and once it was all decomposed, I removed them.


Now it’s Autumn of 2019 and I decide to get rid of this last remaining strip of grass between the garden and the sidewalk seen below. It is a nuisance to trim and the plants need more room. I could of course cut back the plants but I’d rather have less grass.

When working against a concrete edge like this sidewalk, it is important to get the cardboard tucked down an inch or so between the concrete and soil. Use a flat blade from a spade or edger to pry the turf away from the concrete edge to make it easier to tuck the cardboard in.


The goal is to completely cover the grass. If it has any light peeking through any edge it will find it and keep growing.


It is also important to overlap each piece by a few inches for the same reason. Every bit of grass must be covered so no light can get through.


I marked the locations of our underground sprinkler heads with rocks, so in the summer when it’s time to start watering again I can easily find them and carefully dig to expose them. By then the grass and cardboard should be completely or mostly decomposed and easy to poke around in.


In some of the earlier photos above you will notice the cardboard is dry. I soaked it after laying it, but before covering it with mulch. Now I prefer to soak it before laying. I soak it in a big plastic tub, but if you can’t, then you can let a sprinkler spray it for a while to wet it. I think wet card board is easier to lay and conform to the ground undulations. Wind doesn’t tend to shift wet cardboard around either before you can get a heavy mulch on top of it. But be careful not to get it too wet. Sopping wet cardboard tears easily and can be harder to get it from the tub to where you want it.


That is a large size concrete mixing tub. It held all the cardboard I needed to do this strip. I let it soak for about an hour while I gathered the tools I needed for the project. A wheelbarrow would be a great choice too.

I like to put mulch over wet cardboard rather than dry. I don’t want the dry cardboard to pull moisture from the mulch. The key here is everything needs to stay completely covered and moist, so your rainy season is good to take advantage of when timing your project.


The mulch you use can be bag-bought or your own home-made compost. I have used both, whichever I have on hand. It just needs a fairly thick layer on the cardboard so it all stays wet. You could also use wood chip. Mulch, compost, wood chip…it doesn’t really matter. Just use whatever you want the end result to be.


That thin edge of cardboard will remain showing for the winter and possibly into late winter/spring, until it falls apart. It may not look completed or beautiful for those months but it’s a tradeoff I am willing to take rather than dig turf. I could try to cover it with mulch but it will just roll off onto the sidewalk and I don’t want to have to keep sweeping it, and if I still had all those bricks, I would use them to make a nicer looking edge until it is all decomposed.


When my tree leaves begin to fall, I will cover it with them too, adding to the layers, keeping it all moist underneath.


 This is my version of working smarter not harder.
So if you’ve got grass you want to replace with a garden, consider rummaging around in cardboard recycling bins or saving your home delivery boxes. A new garden is only limited by the imagination.


*Cover-to-smother…a super important side note:
When creating a garden close to existing trees, it is critical to use compost or mulch NOT dirt or bagged soil. Dirt and soil will build up the ground level and suffocate the surface roots. Surface roots breath and absorb moisture from the ground surface. When they get buried deeply, they try to regain surface. They can circle the tree trunk and as the trunk continues to grow in circumference, it will be strangled by the root that is circling it. That is called girdling. Girdling will kill any tree. As the trunk is girdled the bark gets compressed closer and tighter to the heartwood. The cells between the heartwood and bark are how nutrients and water get transported up to the canopy and leaves. Once the bark is compressed so tightly to the heartwood, nutrients and sap cannot flow. A thin layer of cardboard, compost or mulch will decompose, keeping the soil level that the tree is used to constant. Additionally, never pile more than an inch of compost/mulch over the top of the cardboard. I see folks all around my local neighborhoods piling up bark mulch or wood chip or compost or soil in huge deep piles way high up against the trunks of their trees. See the two examples following below. This will eventually kill the tree. 


 Please never do this (see above) to any tree. Ever. When planting a potted tree, always plant it at the soil level it is in the pot. Dig your planting hole 3 times the width of the pot but no deeper than the soil level in the pot. When adding mulch never pile up more than an inch deep close to the trunk or within the drip zone. A drip zone is the circumference below the tree’s canopy marked by rain dripping off the edges of the branches, straight down.


Tree trunks have a natural flair at the base. Tree flair must be maintained for a healthy tree (above). Some trees exhibit more flair than others.


I know this is a longer post than is my usual and I am grateful you read it to the end. A few of my previous posts in this blog touch on this method of grass removal, but I have been photo-documenting the making of this garden over the years to make a more complete account. I hope this is understandable and encouraging for you to create more garden space easily. No grub hoe needed.

Any questions? Please comment below.

Thanks for reading. Cheers!

In Bloom in my Garden Today: Alyssum, Aster, Coreopsis ‘moonbeam’, Crocus, Cuphea vermillionaire, Cyclamen hederifolium, Daisy, Eupatorium rugosum ‘Chocolate’ (joe pye weed), Fuchsia, Geum, Heuchera, Kirengeshoma palmata, Kniphofia ‘Echo Mango’, Lavender, Nepeta ‘six hills giant’ (catmint), Phygelius, Salvia garanitica ‘black and blue’, Solanum crispum
Author’s photos

Wednesday, March 6, 2019

A New Toy


You know you’re a real gardener when you think compost is a fascinating subject. ~Author unknown
  
I love dirt! I love making beautiful, sweetly aromatic compost and spreading it around the garden. I love raking Autumn leaves onto the garden beds, knowing they will protect roots from winter’s cold and keep spring’s weeds from growing. I love composting my garden trimmings, recycling them back into my soil. I love making my own ‘fertilizer’ since compost feeds the soil which in turn feeds plants. Making my own compost with trimmings (selectively of course) from my own garden protects me from buying chemicals, pathogens or weed seeds that can come with bagged store-bought compost. From piles on the ground to enclosed tumblers (which discourage rodents from living in the warmth of a compost pile) there are many ways to make and contain your pile of trimmings as it breaks down.

The healthiest gardens have dirt that is living. Living dirt is supportive of and alive with the organisms (worms, centipedes, pillbugs, earwigs, microbes, fungi and yes… even slugs) that breakdown organic matter (leaves, sticks, twigs, flower petals) making nutrients available to plants roots. If your garden can match what goes on naturally in the woods, it will be healthier. In the forest the soil is never bare. It is always covered, year-round by the decomposing debris that falls from the trees. Fallen branches, leaves and needles cover the earth and begin to decay. Decaying stumps are important too. Here in my Pacific Northwest timberlands there is a native species of huckleberry that prefers decaying stumps in which to germinate its seeds and take root.

Healthy dirt makes gardening easier and more rewarding. Healthy dirt produces healthy plants. That’s a win/win in my book, so it’s no surprise that I attended a seminar on soil science recently. While much of it I already practice, there is always something new to learn, right?

There was lot of valuable information in this seminar but my biggest take away was this, the value of wood chip as a mulch. Wood chip is not the same as beauty bark, which is just bark. Wood chip contains all parts of the tree or shrub and makes a valuable coarse mulch rich in nutrition.  


Coarse mulches allow water and air to move through it so as not to smother the soil or its living organisms below. I always knew wood chip was a good thing. Even better that arborists look for gardeners to give it away free to but a 20-yard pile of wood chip is more than I can use on my little 5000 square foot piece of property in a single season. But if you can use 20 yards or can share with neighbors and friends, a great source is chipdrop.com. Be sure to read all the information including the “expectations” page. It is a free service to recipients but understand that the arborists pay for the service so a nominal payment to reimburse the arborist is only fair. After all, $20 USD for a huge load of wood chip is nothing compared to buying bagged mulch and they deliver it right to your designated location.

At the end of the seminar one of the speakers briefly mentioned as a side note that she has a chipper, a small electric chipper. I’ve wanted a chipper for several years but I don’t have much room to store one out of the weather, nor do I want to fiddle with a gas-powered engine. So, my woody trimmings, too thick to chop up by hand, go into the collection bin that the city picks up. Did she say “small electric chipper”? Hmmm. It would sure be nice to have one. Now I am really interested! When I got home, I started looking online for used sources and found 5 right away! All the same type that is no longer being manufactured and in varying degrees of condition from looks-kinda-rusty to looks-pretty-darn-good.

Soooo….fast forward a week. I am now the delighted owner of my very own electric, 14-amp, 120 volt, 3300 rpm, capable of chipping 1½” diameter branches McCulloch garden shredder! Woohoo!! I’ve been gardening since I was about 5 years old. How is it I’ve never had one of these yet?
  
Turns out there much to learn about my new toy. McCulloch was made in the USA however, this chipper is no longer manufactured, and similar designs are now made overseas so finding replacement parts may be a challenge. I did discover a great source of info on http://www.robsplants.com/chippy.php. Read down through the comments section of his blog post…it covers conversations by owners of this chipper (affectionately named Chippy) as they navigate the replacement parts journey. Turns out parts are becoming available but they are made in China of possibly poorer quality materials so may wear out more often.

Since I bought it used, I figured the blades would need sharpening. There are four blades to keep sharp. Two comprise the upright one-piece “V” blade and then there are two individual horizontal blades which are reversible, extending their life two-fold. I read several opinions about sharpening vs. replacing blades on Rob’s site above but I decided to try sharpening. I just did a light job of it with a couple of files. It cut through my pile almost like butter. I had a lot of green material so the exit chute plugged once. Then twice I pushed dry material through too hard and fast so it jammed. Clearing a jam requires unplugging it and exposing the blades which is not difficult but takes time away from the work so I think a good rule of thumb is every time I have the cover off, I will also give it a quick sharpening. Sharp blades do the work so I don’t have to and most professional gardeners sharpen the blades of what ever they are using after every job or throughout the job. With more practice I hopefully won’t get a blade jam or plugged chute too often.


 There is so much to learn about composting, soil science and the right and wrong way to apply mulch. I’ve long advocated for naturally feeding the soil with compost and protecting the bio diversity of soil life by not using chemical fertilizers, chemical pesticides, or beauty bark. In the archives, under the compost label on this blog you can find 5 more articles that I’ve written on the subject. If you find compost, mulch and dirt as interesting as I do, I hope you will enjoy my other articles. I have provided additional resources below so you can educate yourself to your own degree of interest. These links provide answers to questions and debunk myths that circle around the use of woody mulch. I encourage you to read through them.

Thanks for reading!

For more information see…
gardening.wsu.edu
getchipdrop.com/expectations/

Another great source for all things garden is…
gardenprofessors .com and 
The Garden Professors page on Facebook is a collaboration of Horticultural Professors from around the USA


In bloom in my garden today: Crocus, Cyclamen coum, Hellebore, Sarcococca confusa, Viola,

Author’s photos


Tuesday, October 24, 2017

Raking for Gold


Earth knows no desolation. She smells regeneration in the moist breath of decay.
– George Meredith, 1828-1909, English novelist and poet

Happy fall day!
 
Fall season in the Pacific Northwest is synonymous with alternating bouts of soft rain showers, hard rain, rain deluge, wind, hail, warm-wet storms from the south Pacific competing with frigid northerly winds and more rain. But then the sun will come out and warm and dry us once again. We revel in the beauty of this season as we venture out for our fall walks and absorb the amazingly gorgeous leaf colors that this time of year brings to our little corner of the world.

It’s October. The tree’s leaves reveal their true colors that lie hidden under the chlorophyll as it dissipates with the ebbing sunlight, only to drop as bounty to blanket the ground in glorious color. I love the fall for its beautiful sunny days and the beauty and systematic purpose of creation as it gears down for a long winter’s nap. It also brings the promise of a time of rest for me from what can at times be the rigors of tending the summer garden.

To the savvy and frugal gardener it also means time to rake in the gold!
The gold I refer to are all those deciduous tree and perennial leaves that are beginning to drop. Beautiful, wonderful, nutritious, weed blocking, soil feeding leaves blowing around that land on your lawn and garden beds. If you are like me you purposely planted deciduous trees with small leaves like Katsura and Japanese maple varietals. Small leaves or leaf pieces are faster to decay without smothering and are easy to rake and distribute over your garden beds like a snuggly winter blanket that will become food for your soil by spring time. Food for your soil means food for your plants, which means free fertilizer!


I cannot help but shake my head when I see homeowners and hired groundskeepers blowing leaves away (and into the street only to clog storm drains and cause minor localized flooding…but that’s a rant for another post) or neighbors grumbling as they mow up or rake then dump their leaves into yard waste bins for the city to pick up and haul away. Those leaves go to a compost facility only to be treated like the gold that they are for some months before the compost they become is bagged and sold back to the gardener who then spreads it over their garden. Save your time and money friend. You’ve already done the job of raking it off your lawn, now instead of giving it away, just deposit it over your garden beds and let it do the work of natural decay.

Honestly, can anyone really say they prefer the deafening drone of a gas powered leaf blower over the soft scritch-scritch of a leaf rake? Ever been on a walk, reveling in the beauty of color and sun on a quiet fall day only to round the corner and encounter, well…which would you rather hear? Not to mention the cloud of dust, debris and pollen that blower stirs up…well hello seasonal allergies!

Now that the leaf blower has done its job, the soil is bare once again and awaiting any and all airborne weed seeds to come in for a landing and call your garden home.

Have you ever considered the normal order of the seasons in nature? Rarely if ever, do you see bare soil. The forests annually cover their feet and floor with leaf drop and the meadows clothe themselves with leafy ground-covering perennials. Mostly, where you see a weedy mess is where the ground is regularly swept bare and weeds are allowed to multiply because there isn’t someone or something to constantly monitor or stir up the area.

My entire back and side yard are garden and the only places I have to do regular weeding is along portions of the walkways where foot traffic and breezes push away my annually laid leafy mulch.


My leaf corralling tools are inexpensive and easy to acquire.

1. A garbage can of a size easy for you to handle when full. Dry leaves are very light weight so a full can is not terribly heavy, but if you have to rake leaves between rain showers like I did today, wet leaves can be much heavier so it’s a good idea for your container to be of a size that accommodates your abilities.

2. A spring rake or leaf rake. This is not a heavy plastic rake. This rake has metal tines that are thin, light and springy. They reduce the amount of effort by half (if not more) and actually flip the leaves up rather than dragging them across. Believe me, when you experience the difference you will see the value of this rake.

3. Snow shovel. Don’t you just love the value of a thing that has more than one purpose? I do! It sure saves room in the tool shed. Once you get your leaves into a pile with your beloved spring rake, your trusty aluminum light weight snow shovel is the perfect tool to scoop them and (tilted at just the right angle) pour them easily into your can. With the snow shovel you will get through that pile in no time!
  
That’s it! One rake, one snow shovel and one can. No gas that needs to be mixed with oil. No running to the gas station because the blasted thing is out of gas. No ear plugs. No straps to keep a heavy gas powered-smoke-belching-engine-way-too-close-to-my-head strapped to my back. No machine that needs to drained of the gas/oil (now-what-do-I-do-with-it) before it gets stored for winter. No electrical cords to trip over or curse at because you just. can’t. quite. reach. Ok…maybe just one little rant. Thanks for indulging me.

So now that my can is full, I pull it (mine has wheels 😊) to where I want and proceed to pour out and spread an even layer over the soil, thus putting it to bed for the winter. Initially those fluffy leaves can be a nice 6-12 inch layer. It will quickly settle to less than half. Care must be taken not to cover plant tops with all these leaves. The leaves (leaf mulch only) can be spread up to the stems of plants and it is ok to cover bare crowns of herbaceous perennials like Asparagus or Hostas once their leaves have died back. 

This should be an enjoyable exercise, not a chore. Consider getting out to rake every other day or so depending on your leaf drop (and the weather of course). You can get smaller amounts raked quickly with a modest amount of effort, equating to regular exercise not to mention the de-stress-after-work benefit. If you leave it all to the end when your trees have dropped all their leaves, much of them will have blown away, losing a valuable resource and the job will be more time consuming all at once making it possibly an arduous task that you don’t enjoy. The goal is not to end up with a five foot pile to deal with!

The benefits of this pleasurable activity are numerous…
  1.  Weed control  so your plants aren’t competing for nutrients with weeds. Weed seeds that blow around from neighboring yards can’t find purchase on bare soil because yours is now not bare and it prevents seeds already on the ground from germinating. And who wants to spend time weeding anyway?
  2. Protective layer for plants root systems that may otherwise succumb to freezing temps.
  3.  Fertilizer. Compost and leaf mulch is well documented for its nutritious benefit to the garden.
  4. Soil tilth. Soil microbes and worms and bugs seek out this decaying matter and turn it into food for your plants.
  5.   Soil health and plant health. See 1-4 above.
  6. Gardener health. Cardio, muscle building (hello abs!)and mental health as it’s so good to get outdoors.
It's WIN-WIN! Fall exercise for your body equates to winter protection becoming spring nutrition for your garden. Does it get any better than that?

Fall time in the garden should be enjoyable, savoring the last days of gardening for the year, putting your garden to bed for the winter and putting potted plants where winter’s freezing temperatures won’t harm the plants or break the pots. If you don’t already, please also consider leaving seed heads on certain plants to feed the birds that winter over in your region. Already I am enjoying watching the juncos feed on the seed heads of Liatris and Echinacea. If you need more convincing, please enjoy my previous post for benefit to less fall cleanup and more time to go on lovely fall day walks and take advantage of the mental healing time spent outdoors can provide.

Cheers!

Side note: If your trees have big leaves that does mean an extra step, because big leaves mat down like plates over one another and can smother neighboring plants and shed the rain off that you want to seep in to the soil. Big leaves need to be chopped smaller then corralled by a method of your choosing. A quick search online can give many options but I think the easiest is running your lawn mower over them with the catcher in place, then spread over your garden beds.
  
In Bloom in my Garden Today: Ajuga, Aster, Caryopteris ‘Longwood Blue’ (bluebeard), crocus speciosus (blue fall crocus), Cyclamen hederifolium, Daisy (white double), Eupatorium rugosum ‘Chocolate’ (joe pye weed), Fuchsia, Geranium ‘Mavis Simpson’, Heuchera, Hyssop, Kirengeshoma palmata, Lavender, Nepeta ‘Six Hills Giant’ (catmint), Oregano vulgare compactum ‘humile’ (compact oregano), Phygelius (cape fushia), Rose ‘Shropshire Lad’, Rose ‘Reine de Violette’, Rosemary, Salvia garanitica ‘Black and Blue’, Solanum crispum


Authors photos

Thursday, August 1, 2013

Tagro - Organic By Who's Standard?


Be the change you want to see in the world.
~Mahatma Gandhi

Often people ask me if I use Tagro. My short, politically correct answer is ‘No, it’s not organic’.  What I would really like to say is ‘I wouldn’t touch that stuff with a 100 foot pole.” Even better, I love it when people press me further as to why I won’t use it so I can extol the virtues of organic gardening to yet another person wanting to care for their little part of the earth. 

Tagro is the municipality’s solid waste division’s solution on what to do with human waste.   Some communities call it ‘sludge’ and residents fight to keep the counties from spraying a liquefied version into the forests and woodlands.  The city mixes it with sawdust and sand to give it a crumbly, compost like texture so it looks kind of like compost.  The city then advertises it with lots of tax paid advertising as a “Natural Yard Care” alternative to be used to amend your soil or raked across your lawn instead of fertilizers or natural compost.  Does your community have such a product?

The city touts it to be organic.  Understand there is more than one definition of organic.  Webster’s dictionary has several definitions of organic, two of which are “1. as relating to, or arising in a bodily organ; 2. derived from living things” which is how Tagro can claim a semblance of organic status.  Agricultural practices define organic as “a production system which avoids or largely excludes the use of synthetically compounded fertilizers, pesticides, growth regulators, and livestock feed additives.  To the maximum extent feasible, organic farming systems rely upon crop rotations, crop residues, animal manures, legumes, green manures, off-farm organic wastes, mechanical cultivation, mineral-bearing rocks, and aspects of biological pest control to maintain soil productivity and tilth, to supply plant nutrients, and to control insects, weeds and other pests”.  Research shows organic practices result in regeneration of renewable resources in the soil whereas chemical practices result in dead soil, incapable of feeding plant life without further and continual chemical replenishment because the chemicals kill the living biology of the soil.

In reality, Tagro, sludge and its counterparts are all comprised of chemically treated human waste.  Organic only by a dictionary definition, not mine and certainly not the definition of healthy soil practices. Tagro has the most foul, sour acrid odor which I can smell blocks away if I have the misfortune to be down wind.  It smells nothing like the sweet, earthy smell of real compost or even composted steer manure.  Nor does it have the nutritive value or the tilth building qualities of real compost. 

What it does do is give a huge shot of nitrogen to what ever it touches, so if you rake it across your lawn you must mow your lawn twice a week to keep up with the out-of-control growth. I use a mulching mower which gives a nice shot of natural nitrogen to my lawn which I only have to mow once a week during Spring’s growth spurt.  Spring grass is naturally high in nitrogen so leaving the mulched (more finely chopped than regular mower blades chop) clippings on your lawn to decompose is all the fertilizer it needs.

Because Tagro is chemically treated human waste (along with everything else that gets flushed down the commode, for example pharmaceuticals) I believe it also kills the living organisms in your soil, and the worms.  Dead soil can’t support plant life so you have to buy and use a lot more fertilizer or Tagro. I want living soil microbes and worms in my garden soil. Living soil is what supports plant life, which supports bug life, which supports avian life and on it goes.

Recently I’ve seen Tagro’s potting soil mix experimented with in greenhouse growing operations. In pots it is very heavy in structure, not giving the plant’s roots a good air/water mix for healthy root growth. Also it is physically heavier so lifting pots is more difficult. More importantly the plants growth was stunted and the leaf’s color was off and splotchy. After planting with it for an hour, one of the staff (that would be me) complained of headache. All in all it got a bad report from the commercial growers.

If you want to support your community and utilize its in-house programs, better alternatives are Zoo Doo manure programs and community supported composting businesses. My city collects garden waste and it goes to a business that composts it, then sells it to consumers by the bag or truckload. It is always certified organic. The nearby Zoo Doo program is so popular with gardeners they always sell out quickly every spring. If your local zoo doesn’t have this program perhaps they’d be interested in your suggestion in their inbox.

There are so many healthy ways to organically amend your garden soil. Tagro should never be an option.

In Bloom in My Garden Today:  Agastache foeniculum (anise hyssop), Alyssum,Astilbe arendsii ‘Diamant’, Begonia ‘bonfire’,Borage,Coreopsis ‘moonbeam’,Daisy(white double), Daphne caucasica, Echinacea pallida,Echinacea purpurea magnus, Fuchsia, Gaillardia (blanket flower), Geranium ‘mavis simpson’, Geum, Gladiolus ‘Boone’ (heirloom 1920’s), Green Beans, Lavender, Lobelia, Nepeta, Oregano, Perovskia ‘little spire’, Salvia, Scheherazade oriental lily, Sedum, Star Jasmine (trachelospermum jasminoides), Thyme ‘foxley’, Zucchini, Tomato

Author’s  photo