Showing posts with label propagating. Show all posts

Monday, February 24, 2025

The Tommies are up! Crocus tommasinianus

 For gardeners, this is the season of lists and callow hopefulness; hundreds of thousands of bewitched readers are poring over their catalogs, making lists ..., and dreaming their dreams."

-- Katharine White


Tommies, or Crocus tommasinianus are considered the most squirrel-resistant species of crocus because this species contains a bitter-tasting alkaloid that repels squirrels. Bonus... they re-seed freely for naturalizing! Win! Win!

They are early bloomers and adorable in the weakest of lawns but don't mow until after the leaves have died back, about 6-8 weeks after bloom fade. Those leaves are making food for next years flowers. Thick, fertilized, lush lawns can overwhelm them, so enjoy them in your garden beds instead.

Be sure to plant them in sunny sites. They'll open on sunny days giving a much needed early pollen source to bees.

Tommies, Crocus tommasinianus - look for them.

In Bloom in My Garden Today: Crocus, Galanthus, Cyclamen coum, Sarcococca, Erica 'Kramer's Rote', Helleborus


Saturday, September 12, 2020

In the Hot Bed


Gardening requires lots of water – most of it in the form of perspiration. 

~Lou Erickson

There is a set of stairs at the back of the house dividing the sloped south facing yard into two terraced levels. This is how the beds on both sides of the stairs looked in April when we moved in. The post today is only about the left side, which is up against the foundation of the house and south facing, so it is hot and dry.


My first thoughts were that lavender and sedums would be perfect plants for this area. Once established (after next year) they wouldn’t require a lot of watering as both thrive in hot dryish areas with all day sun, and they would provide food for bees, hummingbirds and other pollinators.
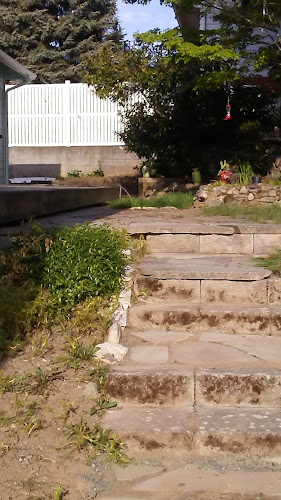
 

The only plants in that bed, aside from weeds, was a vinca tangled up with a Euonymus. The bed is just shy of 3 feet wide and 10 feet long.

Vinca is a vining, far reaching ground cover that is very ineffective at smothering out weeds and it will have to be constantly cut back if it isn’t to interfere with the walkway. It’s out.

The Euonymus is, to my taste, an uninteresting shrub that can reach out 4-6 feet wide and even taller. In this location it too would have to be pruned annually once it reached its mature size. And it would block the view of the garden I planned to create on the other side of the walk. Out it goes too.

The bed was bordered with rocks on the stair edge, presumably to stop the dirt from spilling out onto the stairs. As you can see over time the lower rocks became buried and weren’t doing the job. Lastly, there was a makeshift retaining wall made of mis-matched blocks at the bottom of the bed which had collapsed. Sorry, I didn't get a good photo of that.


All cleared away, now I have a blank slate to work with. First in goes 3 lavenders. “Goodwin Creek” to be specific. I have grown this one before and it is a favorite of mine. I love the indented leaf shape and it puts up long willowy wands of blooms which create lovely movement in the breeze. It also had a longer bloom time in my previous garden than other lavenders. It is a lovely variety. 

Along with the lavender, I added a broken portion of a Mexican pottery pot. I like using broken pots as a little interest, or whole pots turned on their side and angled just so. A little eye candy if you will.


After the lavenders are placed as the “bones” of the space, I filled in with sedums of many varieties from trailing types to hen’s and chicks types, all of which came with me from my previous garden. Sedums are incredibly easy to propagate. They will spread and fill in quickly.

As for the lost rocks edging the lowest steps, I pulled them up and re positioned them. I don’t really like rocks used that way but for now they will stay.
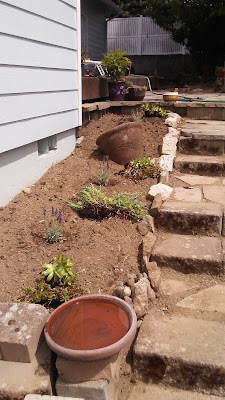
 

If all that isn’t exciting enough, now the icing on the cake happens! This is where my better half comes into his own. He is so creative and talented when it comes to hardscaping our garden spaces. He set about making a beautiful retaining wall to support the end of this bed. He used concrete blocks and capped them with flat stones. The blocks and stones had been left, stashed and buried in different places in this yard, by past owners.


First, he carved out the shape, and poured a footing in concrete.


Then cemented together blocks.


Then he ‘faced’ the blocks with a rough smear of mortar. 

He adds color powder to the mortar to give an aged look to his stucco finish. New concrete dries bright whitish and isn’t particularly lovely. The new brightness can be distracting in the garden, I think. Concrete does darken over time but it takes years. He ‘ages’ it by darkening it with coloring agents so the new wall looks like it’s been there for a long time and it blends better in the garden. I love the rough look of a stucco finish. It transports me to Tuscany or south of the border.


Then he capped it all off with some slate or what ever this stone is. There were several pieces of this stone laying around, apparently left-overs from the construction of the patio some years ago. I am so glad to have them as they are just perfect to finish this wall.


So… what do you think? Coming along nicely, I think. In a year or two you won’t see much, if any, soil after these plants fill in. Covered soil means less weeds. Win Win.

Cheers!

In Bloom in my Garden Today: Rose, Sedum, Agastache, Geum, Fuchsia, Salvia, Verbena, Gladiolus, Mullen, Thyme, Oregano, Calendula, Yarrow, Dianthus, Germander, Cuphea,

Author’s photos

Sunday, June 28, 2020

Let the Fun Begin


My favorite flower is a dandelion, because they are everywhere!
~ Garden art contest entry, age 9

We have moved. We found this garden, I mean house in March, and began moving in April. As gardeners, you know those months in late winter and early spring are crucial for getting ahead of the weed fight. And weeds did this garden space have.

So since April, as soon as it was prudent for me to get my hands in the dirt of the new grounds while the closing-of-a-house process hummed along, I have been doing weed patrol on our new-to-us 9000 sq ft corner lot. The front has a wraparound rockery that is taller than I am, sporting beautiful big boulders. The back yard is terraced with smaller rocks.

The quote above doesn’t reflect my feelings for dandelions, which were legion in number and already blooming in every part of this yard. Truly they were everywhere. When kept in check and not allowed to form seed heads, dandelion flowers provide healthy pollen and nectar for pollinators and leafy greens for people’s food source. But when allowed to spread in urban environments they are a nuisance weed.

As I was pulling dandelions, (and shrieking at those that had already turned to seed puffs) I was also discovering fireweed (Chamerion angustifolium), cleavers (Galium aparine), perennial pea (Lathyrus latifolius, which is on the Washington State Monitor list for noxious weeds), and a lot of turf grass that self-seeded in and amongst the perennials. Thankfully I have found no horsetail and only a few sprouts of English ivy.

The previous gardener put in some lovely perennial selections in the front rockery, which I will keep and perhaps divide or move to other parts of the garden. They also enjoyed self-seeding annuals like forget-me-not, Cosmos, Calendula and Nigella. 

I will keep the Calendula but reduce it to a lesser amount and collect the seeds to sow them where I want more, whereby controlling it’s spread.

I have grown Nigella before. It is also called "Love-in-a-Mist. It has a lovely flower  and the seed is used in some cultures for culinary purposes. You can control it's spread by cutting off the seed heads before they dry. If you want to save the seed for later sowing, allow them to dry on the plant naturally but remove them just as the little holes are opening on the top of the seed pod. 

Here (shown below) in the backyard terraces Nigella were allowed to self-sow and were rampant, thickly carpeting large areas with a mix of turf grass, dandelion, forget-me not and Nigella all tangling with Vinca Minor.


Out it all goes. While some gardens look lovely when annuals self-sow, they are a lot of work to keep contained and mostly look weedy to me, entangling themselves with surrounding plants. Not only that, Forget-me-not is one of those annuals that gets mildew as the plant dies down and looks ugly.

Back to the rockery in front (photo below). I will keep some of the Shasta Daisy and one or two of the Lemon Balm but cutting out quite a lot of both that have taken over and crowded out several other lovely hybrid varieties of Sage, Marjoram and Oregano. I have also pulled out Rumex which will self sow everywhere if given the chance. I will be adding in my favorites and many plant divisions I have taken from my previous garden. Yes, since the previous house is not yet listed for sale, I have been digging in my former garden but not so as to leave gaping holes. My old garden is so packed, I can easily remove favorite divisions without leaving a trace. 😊

Following posts will be the changes I make to edit this lovely garden and make it into my own. And yes, for those who know me and my methods, there will be lots of cardboard used. Good thing I have lots of packing boxes!


In bloom in my garden today: Dianthus, Veronica, Cuphea vermillionare, Hebe, rose, Shasta daisy, Calendula, Potentilla, Astrantia Major, Spirea

Author’s photos

Wednesday, April 15, 2015

Euphoric Over Euphorbia


All through the long winter I dream of my garden. On the first warm day of spring I dig my fingers deep into the soft earth. I can feel its energy, and my spirit soars.
~Helen Hayes, American actress, 1900-1993


Euphorbias (ew-for-bee-a) are native to the Mediterranean’s sandy, hot regions but hybrids have brought hardy varieties to our cooler northern gardens. Grow them in full sun in USDA zones 5-8. They are quite adaptable so don’t be afraid to try them in your garden even if it’s not so Mediterranean-esque. They have a long spring flowering season, and those planted in the more sunny sites often produce the deeper foliage colors. Give them good drainage as heavy soils will kill them quickly and they reportedly don’t like windy sites.

I have three Euphorbia ‘Blackbird’.  Two are in my street side parking strip, notably windier than the one in my back yard. The two that get the wind, flowered just like the one in the back but they are lacking any leaves at this point. They were full and leafy all summer but the cold winter winds have left them bare stemmed. The new growth is coming out leafy so my guess is they will leaf out again with the warmer weather. This is their first year so their performance is yet to be seen over a succession of seasons so I can compare those in the wind to the more protected one.

They are known for their drought tolerance and most have chartreuse inflorescences as seen above on my E. Redwing. An exception being E. ‘Blackbird’ (below) whose flower is more of a rust color aging to apricot with some peachy tones throughout.


Euphorbias comprise a large group of plants ranging from annuals, perennials and succulents enjoying a surge in hybridization which is delighting Euphorbia lovers and collectors with an amazing array of foliage colors and a multitude of plant sizes for both big and small gardens.


E. wulfenii (above) is the tallest I’ve seen, at easily 5 ft (1.5m) tall but E. mellifera reportedly reaches 8 ft (2.4m).  There are others but the shortest I’ve seen is E. myrsinites ‘Donkey Tail Spurge’ reaching less than 6”(15cm) tall and looks quite like a succulent ground cover.

Some Euphorbias are reportedly short lived plants but can easily be propagated by cutting off stems, stripping the leaves off the bottom half of the stem and inserting it into soft soil. This is also a great way to increase the presence of your Euphorbias in the garden. Repetition of plants and or color can make your garden look ‘put together’ and professionally designed.  Some Euphorbias will seed themselves around your garden too. Some may come true to seed but others will not. You may like that habit of self-seeding as a way to fill a garden space.  Nope, not me.  I once had E. dulcis Chameleon that made such a nuisance of itself that I ripped it all out and continued to remove seedlings for a few years to come.  My little postage stamp sized garden doesn't have room for such joyful self-seeding abandon. Either that or I’m too type A to allow it. Hmmm. I think not.

Pruning is easy. When the flower is finished it will begin to turn to seed. That’s when you cut down the old stems to 3-6” (8-15cm) from the ground.  New growth will appear from the base or low on the old stems. Those will be this year’s leafy stems and next year’s flower. Now that you’ve removed the seed heads, the plant’s energy will stop forming seed and be redirected into producing the new leafy stems. When cut or wounded all exude a white milky sap which can irritate the skin and eyes so be careful when working around them.

Lastly a note on using common names. Euphorbias are also known as Spurge and are related to the Poinsettia. However this Spurge must not be confused with the ‘other’ spurge, Pachysandra, which is an evergreen ground cover with white flowers for the shade garden.  They are completely different plants, needing different exposures but sharing a common name. I know relying on common names is easier but as I've said many times on this blog, knowing the Latin botanical counterpart is so helpful to find the plant you are looking for in the nursery because many totally different plants can share a common name, especially if you travel to different parts of the world or even just within the US. 

In Bloom In My Garden: Alyssum, Anemone nemerosa robinsoniana’, Bergenia, Blueberry, Clematis alpina ‘frankie’, Daphne caucasica ‘Eternal Fragrance’, Euphorbia, Geum, Hellebore, Heuchera, Hyacinths, Iris,
 Tulipa, Trillium,Tiarella, 

Authors photos

Saturday, June 22, 2013

Another Peat Free Alternative

"In the spring, at the end of the day, you should smell like dirt."
~ Margaret Atwood


I’ve been experimenting again. And since it is time for many of us to get seeds started for some fall vegetable crops I thought I’d give you another peat free option for indoor seed starting.

Hydroponics is the process of growing crops in water with no soil. Well known to those who grow hydroponic is rock wool. Historically rock wool has been used for decades in some European countries for housing insulation. Today it has been adapted for commercial applications around the world to grow our vegetables in greenhouses. Rock wool is a product of super heated rock until it sort of explodes into fine filaments, kind of like cotton candy (candy floss), then is formed into a usable material. At least that’s my loose translation of what it is. You can get a more detailed explanation at http://grodan101.com/about-us.

Rock wool for seed germination is formed into cubes. It is all natural and chemical free. Each cube is wrapped in plastic which makes it easy to write your planting date and seed variety on the side. It is said to be a biodegradable plastic, but I prefer to remove it when I plant them into the soil, so the roots that emerge out the sides are not hampered in any way. I doubt it biodegrades very quickly. After all plastic is plastic and I don’t want it in my garden. Maybe someday they will change it to a paper wrap. In my situation I don’t need it to be wrapped at all but I suppose commercially the big growers do.

The manufacturer states that rock wool is recyclable but, I think more likely only at the commercial level of use rather than for the average home gardener. Since it is made of rock it does not decompose so as we use a few each season they are more likely to end up in our compost piles after we clean out our vegetable beds at the end of harvest. Crumbling them up into smaller pieces as you find them, they will provide a means of looser soil structure adding to your soil’s tilth, much like stones or sand provide, helping drainage and bringing air down into the soil.

Rock wool cubes are a good choice for starting seedlings because of its air/water transferability. There is little risk of rotting seeds from being too wet as long as it is not sitting in water. I also think they are not so quick to dry out like peat pellets do. I started this tomato Willamette on March 16 and today it is growing and blooming beautifully in my garden.


If you study this option on the internet, you’ll find lots of rules and do’s and don’ts. For instance there is talk of initial Ph level adjusting, lemon juice remedies, and some chat groups say you can’t transfer these into soil growth, etc. I didn’t do any of that and I did plant this tomato into the soil and had no problem at all. The only thing I did do prior to putting the seed into the cube is rinse it well in running water. If you are used to using peat pellets, I used the rock wool in the same way. I moistened it thoroughly first, inserted the seed, kept it moist but not soggy wet and waited for the seed to do its thing. I’ve used them on a heat mat or not, either way.

They cost a little more per each than peat pellets or coir pellets. I didn’t really shop around, I just went to my local hydroponics store for the sake of convenience and time so you may find better prices. If you are looking for peat free alternatives, I encourage you to experiment with rock wool cubes.

Cheers!

In Bloom in My Garden Today: Alyssum, Armeria pseudarmeria latifolia ‘joystick mix’, Asiatic lily, Baptisia, Begonia ‘bonfire’, Bletilla pink, blueberries, Carnation, Daisy(white double), Daphne caucasica, Digitalis grandiflora, Fuchsia, Gaillardia (blanket flower), Hardy Geranium, Heuchera, Hosta, Kniphofia ‘little maid’, Iris, Lavender, Lobelia, Mullen chaixii ‘Album’, Nepeta ‘six hills giant’ (catmint), Peas, Phygelius ‘new sensation’ (cape fushia), Rose, Salvia, Sedum, Thyme, Tomato, Veronica ‘royal candles’

Author’s photo


Wednesday, March 6, 2013

A Better Way to Get Your Peas Started


I used to visit and revisit it a dozen times a day, and stand in deep contemplation over my vegetable progeny with a love that nobody could share or conceive of who had never taken part in the process of creation.  It was one of the most bewitching sights in the world to observe a hill of beans thrusting aside the soil, or a row of early peas just peeping forth sufficiently to trace a line of delicate green.
~Nathaniel Hawthorne, Mosses from and Old Manse

In years past I used to start my peas outside in late February with not so great success. Here in the Pacific Northwest our damp cool weather is great for pea germination but also heavenly for slugs that usually ate more than their fair share of my emerging seedlings. So I began sowing my peas indoors in a variety of cell trays and soils, experimenting to find the right mix.  A couple of years ago I began soaking the seed 24 hrs before planting to plump them and speed up the process of germination. I’d been doing this soaking method with corn for many years with great success. Planting the plumped peas and watering them after planting seemed to work ok but I only usually got half germination and the other half rotted, gooey seed every time. Clearly too much water. As I stated in the previous post, moisture, air and temperature is a delicate balance for good germination. I should add here that old seed does not germinate well either but I knew my seed was still viable.

 Fast forward to last year when I used to work with Sarah, a horticulturist at the greenhouse where I volunteer. She always grew her crops on the drier side of usual. A week ago while buying a new package of peas, since more than half of those I sowed on February 15 have now rotted, I talked to the proprietor about soaking pea seed. He suggested never soak the seed more than one hour and rather than watering them into the soil, use a mister to keep the soil barely moist but never dry. If you are using peat-less potting soil, it may have some moisture in it straight from the bag, mine did. Keeping what he said in mind and the success Sarah had with her drier growing methods I tried it. I sowed the seed on February 26 and now 8 days later nearly all have emerged with the few remaining beginning to push up the soil so I can already see I have 100% germination success!
 
 
 So from now on I will be keeping to this procedure:

  • I start my pea seed in plastic cell packs indoors to keep slugs from mowing over the emerging crop.

  • I soaked the peas for 1 hour or a little less, not more. This time I am planting Cascadia snap peas.

  • I used standard organic potting soil as pea seed is large enough to push through the chunkiness of potting soil, (tiny seeds like basil, lettuce and tomato will do better in a fine seedling mix which contains peat). Make sure your soil of choice is organic with no fertilizers or wetting agents added.

  • I used a mister to add moisture rather than a watering can only as needed, keeping the soil barely, slightly moist.

  • I put the planted cells in a recycled “clam shell” food container (I think it had baby croissants in it from the bakery originally) to hold in moisture so I actually didn’t have to mist much at all. If you don’t cover your cells you may need to mist a little more often. A plastic dome  like cover works like a greenhouse and recycles its own moisture which will collect on the top and drip back down to the soil.

  • I did not use a seedling heat mat this time but have in the past. Peas don’t really need it.
My peas are well on their way to being happy vines! As they get a little bigger and some leaves start to form I’ll harden them off for covered outdoor temperatures so I can put them outside under my little plastic cover on the south side of my house where they will get better light. When they are a good 6 inches (15cm) or so tall I’ll harden them off again for no protection at all, and then plant them around my bamboo teepee. I’ll be picking peas in no time, woohoo!

In Bloom in My Garden Today: Tete-a-Tete daffodil, Crocus, Cyclamen coum, Galanthus elwesii (snowdrops), Heath (Erica carnea ‘springwood white’), Hellebore, Rhododendron, Sarcococca confusa,

Author’s photo

Monday, January 2, 2012

Rose Hips. Winter's Gems

"Another fresh new year is here . . .
Another year to live!
To banish worry, doubt, and fear,
To love and laugh and give!

This bright new year is given me
To live each day with zest . . .
To daily grow and try to be
My highest and my best!

I have the opportunity
Once more to right some wrongs,
To pray for peace, to plant a tree,
And sing more joyful songs!"  ~ William Arthur Ward

New Year’s Eve and New Year’s Day were a stellar days here in the Pacific Northwest! They were crisp, cold and gloriously sunny with just a few wispy clouds overhead. The blue skies gave promise of joy in the New Year.

As we started on a long, hilly walk Saturday I noticed a squirrel in my rose bush in the front yard. It was eating the rose hips. I’d noticed some birds doing the same thing last week but I can’t say I’d ever seen a squirrel eating them. It stayed for quite a while before moving on to the seeds of my neighbors lilac tree.

When I started gardening I was told you must keep rose hips from forming or they would take strength from the rose, weakening it year after year. Now I believe quite the opposite. Rose hips are simply the seed pods that form once the flower is finished. For the plant it is one method of survival to form seeds to drop and grow more of itself. In fall when the day length shortens and temperatures drop it is also a signal to the plant that it’s time for it to power down for a dormancy period…like winter. A dormant plant will not succumb to winter’s damaging temperatures, or at least will have a better chance of survival.

The key is to know when to cut the faded flowers off and when to leave them to form hips. Keeping your roses deadheaded does indeed keep the blooms coming. I deadhead my roses all spring and summer, but once fall is well underway I stop deadheading. Let the flower whither on the stem, let the petals fall and in time you’ll see the rose hips forming.

Not all rose varieties have showy hips. Some are very small and not colorful. As you peruse the catalogs and nurseries, look specifically for reference to hips in the plants information tag if you want the lovely winter jewels for your garden. Some are as big as cherry tomatoes as seen in this picture. This is not my rose but I believe it is a Rugosa variety.


These are the lovely orangey hips from Bonica.


These are the hips the squirrel and birds were feasting on. I often tuck stems of these tiny bright red hips into my Christmas decorations.


You may have heard of how high rose hips are in Vitamin C. They are often used as the main source of Vitamin C in commercial supplements. I’ve eaten one once and found it bitter. My friend found it rather tasty. Now I know we picked it too early, as they sweeten after the first frost. Rose hips are used in many recipes of jellies, jams, tea, purees, sauces and syrups. Culinary rose water is made from the flower petals however. Harvest your rose hips after the first frost and prepare them by trimming off the stem and blossom ends, cutting them in half and removing the seeds then washing them well. I must stress how important it is to grow your roses organically whether they are used for your food or allowed as food for wild life. Chemicals are not needed to grow great disease free roses and many pesticide chemicals are systemic, traveling through the plant’s tissues. They cannot be washed off.

Minimal fall garden cleanup such as this gives a bounty of seeds and berries and hips in my garden for the wildlife to feed on during the winter months. And it provides endless hours of entertainment for me. Bird watching aside, I’m also getting ready to start some seeds on the window sill for spring planting. Oh and by the way, thus far the bees are faring well.

As I’ve mentioned before, I am unable to post as often as I had previously or would like to but I plan to keep this blog active and someday hope to pick up the pace again. Sorry for the long lapses in posts, I hope you’ll stick with me. You can receive new posts via email if that’s more convenient for you by using the email button in the right hand column.

Thanks for reading! Looking forward to a new year of gardening with you.

In Bloom In My Garden Today: Heather (Erica carnea ‘springwood white’), Geum, Gaillardia (blanket flower), Daphne caucasica ‘Eternal Fragrance’ and ‘Summer Ice’, winter pansies, Alyssum, Sarcococca confusa

Author’s photos

Sunday, May 1, 2011

Bergenia

Take thy spade,
It is thy pencil;
Take thy seeds, thy plants,
They are thy colours.
~William Mason, The English Garden, 1782

Are you one that thinks red and magenta shouldn’t go together?

Perhaps Bergenia ‘Evening Glow’ will change your mind. The color combination is truly eye-candy, grabbing your attention from across the garden. When I originally purchased this plant, the tag was labeled Bergenia ‘Abend Glut’ which is German for Evening Glow. For some reason all the tags I see now have been translated to Evening Glow. I think I liked the German vernacular better but it seems to be changed, at least here. Look for either to be sure to find the correct hybrid.

Bergenia, also known as ‘pig squeak’ (I have no idea why) or ‘elephants ears’, is hardy in USDA zones 1-9. This variety seems to do better in my garden with more sun, providing they don’t completely dry out too often. I have some in less sun but they don’t bloom as well, the leaves are smaller and they don’t have as much winter color. Those planted in morning sun or early afternoon sun with partial shade in the hottest part of the day give me the best blooms. You may want to experiment with locations to find the best spot in your garden. As always, the further north you live from the equator the more sun these plants can handle. If you live in a hot region, try them in some afternoon shade or light dappled shade all day. If they get too much sun, you could see shriveling leaves, spotting on the leaves, crispy leaf edges, and/or general unhappiness in the plants appearance.

Left are the lovely, large leaves of ‘Evening Glow’ …green in summer turning a gorgeous wine color in winter’s chilly temps (below). The more winter sun they get the more the leaves color up. This variety also keeps its leaves all year. While other varieties I’ve seen become a mass of dried or mushy leaves after a freeze, ‘Evening Glow’ stays strong in the garden. The photo below was taken in March after an especially cold, icy, snowy winter; obviously unaffected.


Bergenia is a great ground cover filling in to form a nice mass of large leaves. Our city has it in these sidewalk plantings. It can handle a little abuse from pedestrians concentrating on texting when they should be watching where they’re walking. Also when the clump is established it can take some drying out. This city planting is not irrigated.


To divide your mass, simply begin lifting the plants out of the ground with the help of a garden fork. They’ll break into smaller chunks. You can trim the rootstock to manageable size and plant them.


Even if you don’t get any smaller roots with the main rootstalk, it’ll root out. A piece as small as seen below will be fine, providing you don’t let the surrounding soil dry out. They store a lot of water and energy in the rootstalk, stems and leaves.


Plant it and water it in…notice how the leaves look chopped off in the next photo? They are. That piece of root can’t support full leaves anymore so cut them in half. That will allow the energy to go into producing new roots and not be wasted on trying to keep the whole leaves hydrated. It will put out new leaves as the roots grow and strengthen. Cut all the leaves in half on all your root pieces, even if they look like the bigger one. This practice also helps the plants stability. On windy days leaves can act as a sail, wiggling the plant out of the soil. Cutting the leaves down (but not off) keep the plant stable so new roots won’t be damaged while they are trying to grow.


Not all varieties are as nice as ‘Evening Glow’. I used to have Bergenia ‘Silber Licht’ aka ‘Silver Light’. The leaves did not seem to be as sturdy so was constantly eaten by slugs, not as nice in winter and they spotted with red spots. It’s white flowers spotted too so I got rid of it and divided my ‘Evening Glow’ to replace it.

So now what do you think of red and magenta together? Bergenia ‘Evening Glow’…it’s a stunner!

In Bloom In My Garden Today: Bergenia, Ajuga, Kale, Tulips, Geum, Erythronium ‘pagoda, Fritillaria, Brunnera macrophylla, Anemone nemorosa, Dicenta alba (white bleeding heart), Skimmia, Muscari (Grape Hyacinths), Rhododendron, Mahonia, Clematis, Wood Hyacinths, primrose (double English), Heleborus, Bellis perennis (English daisy), violet primrose


Authors photos