Showing posts with label water. Show all posts

Saturday, January 30, 2021

Embracing Wildlife

 "If we can teach people about wildlife, they will be touched. Share my wildlife with me. Because humans want to save things that they love." 

~ Steve Irwin


Yay! I am certified!

Embracing wildlife in the garden brings innumerable rewards. Creating wildlife-friendly plantings is how we do it.  Consider what comes into your yard already. Do you want them to keep coming?  Do you want something that you don’t see?

It’s simple really. Animals and insects need food, water and shelter just like you and me. Incorporate plants that will attract what you want to see more of into your garden spaces.

When buying plants for your garden, many plant labels give some wildlife information that can help you make your choices. The most common symbols I see on labels are for attracting butterflies, pollinators and hummingbirds and for deterring rabbits and deer.

 Firstly, water. Be sure to add a fresh water source or two to your garden for them to drink and/or bathe in. And remember to keep the water fresh and its container clean. You may need to hose it out and refill it daily depending on its popularity. Be sure to locate your water container where you can see it often, every day. You will be rewarded by seeing the wildlife that comes to it.

 Thrush at the fountain.


 Robin at the water bowl.

It doesn’t have to be elaborate. This (above) water bowl is just a saucer that is sold for catching water under pots.

If you have cats or dogs that visit your garden, I would suggest not putting a water source this low to the ground. You can raise it up on a tall stump or a stack of bricks or concrete blocks. Safety to the wildlife is key in enjoying them in your garden.

The depth of the water will attract different size birds for bathing. Shallow bowls will attract smaller songbirds while deeper water will be easier for large birds to bathe in. And hummingbirds love flitting through a mist, so a pump with spray may be in order for you.

 As for shelter, birds not only use birdhouses for rearing their young in the spring and summer, they can also use it for shelter during winter storms. 

Be sure to keep them mounted at an accessible height for you but out of reach for cats. I do clean the bird houses out late each winter before birds actively begin searching for a place to nest. A couple of times there were unhatched eggs that had rotted or babies inside that had died. It needed to be cleaned out or new lodgers would not have come, I think.

Lastly is the topic of feed. Best, first and foremost, are plants that offer natural food sources like nectar, pollen and berries all throughout the year, not just summer. In the two photos below, honeybees are gathering pollen or nectar to take back to their hive.

 Honey bee on Helianthus ‘Lemon Queen’

 Honeybee on Verbascum chaxii ‘Album’

When you attract insects, don’t begrudge them taking advantage of your plants for their needs other than food. In the next photo, this is not damage in my opinion. This is evidence of the leaf cutter bee.


They cut out perfect circles in soft leaves. They then fly back with the disc to use as packing material for its tubular nest to protect the larvae till ready to hatch. I welcome these holes and smile every year when I see leaf cutter bees are active in my garden. If you happen to see one in the very act of leaf cutting, you are very lucky indeed. It is fun to watch. Leaf cutter bees are passive and one of the many native pollinators here in the U.S. We need them.

 Food supplementation is not without controversy, but I do believe it has a legitimate place in the wildlife friendly garden. If your garden does not offer winter food sources naturally, you may consider feeding.

Suet for bird feeding is a debated form of feed, but I do offer it during all the cold, rainy months.


Winter winds drive winter’s rain into seed feeders of all types in my experience. Soggy seed feeders are a mess to keep clean and molded seed is hazardous to your feathered visitors. I choose to feed suet because it is not affected by rain, it is consumed quickly and many species of birds come to it.

The hummingbirds will find nectar in a very large variety of flowers.

Commonly they are seen sipping from the plants with more tubular shaped flowers like penstemon, salvia and fuchsia.  However, I have also seen them on roses, and in the winter months they visit my Camelia ‘Yuletide’ which is not tubular, yet attractive to them by its red flowers and nectar stores.

 Here a green Anna’s hummingbird enjoying nectar from flowers on the right hand side of this pot of fuchsia plants.


If you feed them with a syrup mixture, it is not recommended to use that red dye stuff you buy at the store in a box. It contains a red chemical dye which is toxic for people and birds alike. The red plastic tops and tubes on feeders are enough to catch the hummingbird’s attention.


A simple syrup you make yourself with equal parts table sugar and boiling water, dissolved and cooled is better for them. Frankly they will find your offering with no color on the feeder at all but if you want red, buy one that has red parts. Or you could hang it with a red ribbon, tie on a red flower or use a red ‘write-on-glass’ pen to add some color to the glass bottle.

In reality, hummingbirds also feed on lots of flowers that are not red. While the color is attractive to them, it is not critical. Once they find your syrup feeder, they will be back as long as you keep it clean and filled. Give it a good wash out with a bottle brush before each refill. Check it weekly if not more often. Sugar water can mold quickly especially if in a sunny location. Shade is a more desirable choice. Depending on traffic, be prepared to fill it weekly or every couple of days.

You may find suggestions online for various syrup recipe ratios based on seasonal changes. Honestly, I used to do that but don’t anymore. They come year-round to my feeder with the same 1:1 water/sugar ratio recipe.

Feeding deer or rabbit is another matter. Plant tags with a slash through an image of deer or rabbit signifies plants that neither will tend to eat. If you have a lot of foraging deer in your vicinity, don’t plant roses or other plants they are known to devour. Personally, I would rather have the occasional deer wander through my yard instead of a lot of roses.

Don’t get me wrong. I like roses and have had many over the years. In my previous garden I had 3 Old English roses in the back yard where the deer didn’t go.

There are two roses in this garden that have been here for a very long time judging by the size of the older canes. This guy nibbles a few blossoms each time he comes by but he doesn’t devour the whole plant.


I will keep the roses for the time being. I don’t really like where they are planted nor do I know what kind they are, but they bloom all summer and well into the winter, don’t require extra summer watering or fertilizer and must not be like candy to the deer, like most fussy hybrid teas roses are.

Apparently, deer like fuchsias too. I see hoof prints often in my garden after one or more has been by the night before. Other than hoof prints the only evidence of browsing I have seen was that he ate all the top blossoms off this big pot of fuchsias pictured above. I don’t mind. I love seeing deer and we are not overrun with herds of them where I live and garden. They left enough flowers for me and hummingbird to enjoy too.

Deer are foraging wildlife. When food is abundant they will be choosy. When food is scarce they will be less so. Understanding this, there are many lists of deer resistant plants any internet search will provide you with, as well as symbols on plant lables, but accept the fact that when food is scarce they will eat even that which they may not prefer. They don’t read those lists. The lists are simply guides for you and me based on someone elses previous experience.

As for bunnies, we had tons of them in the spring. They nibbled a few low-to-the-ground flowers on the veronica but I didn’t mind at all.  Mostly they just ate the soft fresh leaves of the clover, dandelion and grass. I always leave clover in the grass anyway. It feeds nectar to bees and pollinators and clover root fixes nitrogen in the soil which feeds the grass. I have enjoyed seeing bunnies come by as part of my local wildlife mix too and don’t mind their nibbling on some of the plants. There’s enough to go around for us all to enjoy.

There is so much more I could write on this subject, but hopefully this is enough to whet your appetite for ideas if you want to create a wildlife friendly garden.

Here in the USA, many states have a backyard sanctuary program. The signage in the first photo proves my certification based on the requirements of the Washington Department of Fish and Wildlife. If where you live has such a program, I encourage you look into the certification requirements. The signage sparks interest and conversation and maybe more wildlife friendly gardens will grow.

Thanks for reading and happy gardening!


In bloom in my garden today: Geum, Camellia ‘Yuletide’, Primrose, Calendula, Erica carnea winter heath, Lithodora, Erysimum (wallflower)

Bird photos courtesy of Patrick L. Chissus photography. You can see more of his work on Instagram @nwmaritimephotography

All other photos are mine.

Saturday, September 12, 2020

In the Hot Bed


Gardening requires lots of water – most of it in the form of perspiration. 

~Lou Erickson

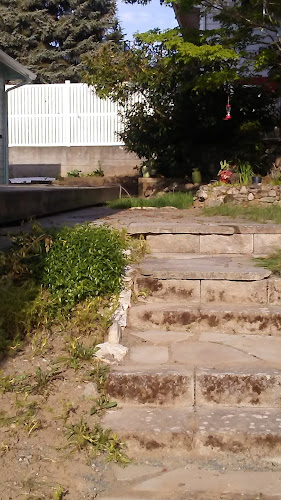
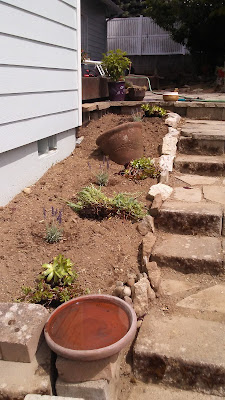
There is a set of stairs at the back of the house dividing the sloped south facing yard into two terraced levels. This is how the beds on both sides of the stairs looked in April when we moved in. The post today is only about the left side, which is up against the foundation of the house and south facing, so it is hot and dry.


My first thoughts were that lavender and sedums would be perfect plants for this area. Once established (after next year) they wouldn’t require a lot of watering as both thrive in hot dryish areas with all day sun, and they would provide food for bees, hummingbirds and other pollinators.


The only plants in that bed, aside from weeds, was a vinca tangled up with a Euonymus. The bed is just shy of 3 feet wide and 10 feet long.

Vinca is a vining, far reaching ground cover that is very ineffective at smothering out weeds and it will have to be constantly cut back if it isn’t to interfere with the walkway. It’s out.

The Euonymus is, to my taste, an uninteresting shrub that can reach out 4-6 feet wide and even taller. In this location it too would have to be pruned annually once it reached its mature size. And it would block the view of the garden I planned to create on the other side of the walk. Out it goes too.

The bed was bordered with rocks on the stair edge, presumably to stop the dirt from spilling out onto the stairs. As you can see over time the lower rocks became buried and weren’t doing the job. Lastly, there was a makeshift retaining wall made of mis-matched blocks at the bottom of the bed which had collapsed. Sorry, I didn't get a good photo of that.


All cleared away, now I have a blank slate to work with. First in goes 3 lavenders. “Goodwin Creek” to be specific. I have grown this one before and it is a favorite of mine. I love the indented leaf shape and it puts up long willowy wands of blooms which create lovely movement in the breeze. It also had a longer bloom time in my previous garden than other lavenders. It is a lovely variety. 

Along with the lavender, I added a broken portion of a Mexican pottery pot. I like using broken pots as a little interest, or whole pots turned on their side and angled just so. A little eye candy if you will.


After the lavenders are placed as the “bones” of the space, I filled in with sedums of many varieties from trailing types to hen’s and chicks types, all of which came with me from my previous garden. Sedums are incredibly easy to propagate. They will spread and fill in quickly.

As for the lost rocks edging the lowest steps, I pulled them up and re positioned them. I don’t really like rocks used that way but for now they will stay.


If all that isn’t exciting enough, now the icing on the cake happens! This is where my better half comes into his own. He is so creative and talented when it comes to hardscaping our garden spaces. He set about making a beautiful retaining wall to support the end of this bed. He used concrete blocks and capped them with flat stones. The blocks and stones had been left, stashed and buried in different places in this yard, by past owners.


First, he carved out the shape, and poured a footing in concrete.


Then cemented together blocks.


Then he ‘faced’ the blocks with a rough smear of mortar. 

He adds color powder to the mortar to give an aged look to his stucco finish. New concrete dries bright whitish and isn’t particularly lovely. The new brightness can be distracting in the garden, I think. Concrete does darken over time but it takes years. He ‘ages’ it by darkening it with coloring agents so the new wall looks like it’s been there for a long time and it blends better in the garden. I love the rough look of a stucco finish. It transports me to Tuscany or south of the border.


Then he capped it all off with some slate or what ever this stone is. There were several pieces of this stone laying around, apparently left-overs from the construction of the patio some years ago. I am so glad to have them as they are just perfect to finish this wall.


So… what do you think? Coming along nicely, I think. In a year or two you won’t see much, if any, soil after these plants fill in. Covered soil means less weeds. Win Win.

Cheers!

In Bloom in my Garden Today: Rose, Sedum, Agastache, Geum, Fuchsia, Salvia, Verbena, Gladiolus, Mullen, Thyme, Oregano, Calendula, Yarrow, Dianthus, Germander, Cuphea,

Author’s photos

Wednesday, March 6, 2013

A Better Way to Get Your Peas Started


I used to visit and revisit it a dozen times a day, and stand in deep contemplation over my vegetable progeny with a love that nobody could share or conceive of who had never taken part in the process of creation.  It was one of the most bewitching sights in the world to observe a hill of beans thrusting aside the soil, or a row of early peas just peeping forth sufficiently to trace a line of delicate green.
~Nathaniel Hawthorne, Mosses from and Old Manse

In years past I used to start my peas outside in late February with not so great success. Here in the Pacific Northwest our damp cool weather is great for pea germination but also heavenly for slugs that usually ate more than their fair share of my emerging seedlings. So I began sowing my peas indoors in a variety of cell trays and soils, experimenting to find the right mix.  A couple of years ago I began soaking the seed 24 hrs before planting to plump them and speed up the process of germination. I’d been doing this soaking method with corn for many years with great success. Planting the plumped peas and watering them after planting seemed to work ok but I only usually got half germination and the other half rotted, gooey seed every time. Clearly too much water. As I stated in the previous post, moisture, air and temperature is a delicate balance for good germination. I should add here that old seed does not germinate well either but I knew my seed was still viable.

 Fast forward to last year when I used to work with Sarah, a horticulturist at the greenhouse where I volunteer. She always grew her crops on the drier side of usual. A week ago while buying a new package of peas, since more than half of those I sowed on February 15 have now rotted, I talked to the proprietor about soaking pea seed. He suggested never soak the seed more than one hour and rather than watering them into the soil, use a mister to keep the soil barely moist but never dry. If you are using peat-less potting soil, it may have some moisture in it straight from the bag, mine did. Keeping what he said in mind and the success Sarah had with her drier growing methods I tried it. I sowed the seed on February 26 and now 8 days later nearly all have emerged with the few remaining beginning to push up the soil so I can already see I have 100% germination success!
 
 
 So from now on I will be keeping to this procedure:

  • I start my pea seed in plastic cell packs indoors to keep slugs from mowing over the emerging crop.

  • I soaked the peas for 1 hour or a little less, not more. This time I am planting Cascadia snap peas.

  • I used standard organic potting soil as pea seed is large enough to push through the chunkiness of potting soil, (tiny seeds like basil, lettuce and tomato will do better in a fine seedling mix which contains peat). Make sure your soil of choice is organic with no fertilizers or wetting agents added.

  • I used a mister to add moisture rather than a watering can only as needed, keeping the soil barely, slightly moist.

  • I put the planted cells in a recycled “clam shell” food container (I think it had baby croissants in it from the bakery originally) to hold in moisture so I actually didn’t have to mist much at all. If you don’t cover your cells you may need to mist a little more often. A plastic dome  like cover works like a greenhouse and recycles its own moisture which will collect on the top and drip back down to the soil.

  • I did not use a seedling heat mat this time but have in the past. Peas don’t really need it.
My peas are well on their way to being happy vines! As they get a little bigger and some leaves start to form I’ll harden them off for covered outdoor temperatures so I can put them outside under my little plastic cover on the south side of my house where they will get better light. When they are a good 6 inches (15cm) or so tall I’ll harden them off again for no protection at all, and then plant them around my bamboo teepee. I’ll be picking peas in no time, woohoo!

In Bloom in My Garden Today: Tete-a-Tete daffodil, Crocus, Cyclamen coum, Galanthus elwesii (snowdrops), Heath (Erica carnea ‘springwood white’), Hellebore, Rhododendron, Sarcococca confusa,

Author’s photo

Wednesday, June 9, 2010

Cleaning the Water Butts

God made rainy days so gardeners could get the housework done.
~Author Unknown

Now that the title has got your attention, I have to explain to my American readers that we’re talking about rain barrels here…what did you think?? No surprise to my UK readers. What ever you call it, it’s a great way to collect free, clean water to use in your gardens. And I might add, house plants love it too because it has nothing added to it to ‘purify’ it.

I made all 3 of my 55 gallon rain barrels and a compost bin from former pickle barrels that I got from the Nalley’s Pickle Co before they closed the business in this area. They have a two part cap-and-ring style lid in which I drilled several holes so water from the downspout can drip in. I used nylon window screening just under the lids to screen out debris. They each have an overflow outlet near the top with tubing running down to the garden below so I don’t have to go out there in a downpour to open the spigot when they overflow. Then I drilled holes as low as possible, but high enough so I could reach in to be able to attach the spigots/washers/nuts for the outflow. It would probably be boring to read about all the parts and pieces I used. So I’ll just say I just went to the hardware store with a mental plan of how I wanted to make them and spent more than an hour finding parts that would accomplish it. All the parts I used were found in both the PVC plumbing and garden sprinkler departments. Back and forth I went more than once. Of course you can buy rain barrels already complete, but I’m a do-it-yourselfer, a problem solver and like to build/design things.

Naturally the size of roof you connect it to will determine how quickly it fills up. I have one attached to my house downspout…that one fills up in a day during a heavy rain. I have two attached to the smaller garage roof and they can take more than a week to fill. It would be better to attach two or all three to the house but aesthetics are important to me and garden space wouldn’t allow.

Two of the barrels are in the sun and one in the shade. I think it’s best to keep them in the shade if you can but even that one got ‘fragrant’ if I didn’t use it quickly enough. Each summer when I use up all the stored water, I open them up and give them a good rinse out and brush down (on the inside) with a long handled car wash brush. A quick, easy and not particularly unpleasant job.

Still, all that stagnant water can get foul at times. What to do? As a kid, didn’t I have a fish tank and didn’t the filters always use charcoal to keep the water clear? Why not charcoal for water butts? So I bought a bag of natural BBQ briquettes. Natural, with nothing added, as many manufacturers have added chemicals for better combustion. I put them in a nylon mesh bag (actually made for straining paint found in the paint dept), tied a long string to it and lowered it to the bottom of the barrel. By golly I think it really does help! It does seem to keep the water cleaner longer, at least by the time I use it up now.

So every year at cleaning time I re-supply the briquettes, about 6 or 8 per bag. They do eventually dissolve into a mucky ooze which I just turn out into the garden. Briquettes are wood ash, which is potash, the third nutrient on the NPK fertilizer list. Potassium (potash) is necessary for the development of strong plants able to overcome disease susceptibility and maintaining balanced nitrogen use. Potassium (potash) also alkalinizes soils that are too acidic. Then with clean, scrubbed insides and a fresh bag of briquettes they are ready for our next PNW rainstorm to fill them back up again.

Rain barrels don’t have enough water pressure to run a sprinkler but are great for filling watering cans, topping off water features, bird baths and rinsing off tools and boots. I can hook up a hose to them to run water anywhere the hose can reach, but it’s only gravity fed so the water runs slower. The lower the water level, the slower the water runs. That said, they do have their uses.

Do you have rain barrels? If not, do you plan to install any? If you get a lot of rain like we do here in western Washington they are great, and we can use them most of the spring and early summer months until the rain dries up!

In bloom in my garden today: Hardy Geranium, Peas, Heuchera ‘Palace Purple’, Armeria latifolia ‘Joystick’, Dianthus, Day Lily, Aquilegia (Columbine), Rose, Nepeta ‘Six Hills Giant’, Iris, Geum ‘Lady Stratheden’, Saxifrage, old fashioned Coral Bells (Heuchera), Alpine strawberry, Daphne caucasica ‘Eternal Fragrance’ and ‘Summer Ice’


Author’s photo