Education is not the filling of a pail,
but
the lighting of a fire.
~ Wiliam
Butler Yeats
I have
been playing with outcropping rocks again.
This property is sloped on all sides. We sit atop a hill on a corner lot so, all four sides of the house consist of sloped ground. Therefore, there are lots of opportunities to play around with differing ways to keep water accessible to the plants rather than simply flowing past.

Above is a picture of the back yard, taken by the seller’s realtor, so it was taken just weeks before we bought the house. To be proper, this photo credit belongs to NWMLS. Reader Kathy G asked for views that express the larger picture of the yard areas so as to get a better idea of the grounds overall, so I will endeavor to do that as I can. My camera phone is limited needless to say.
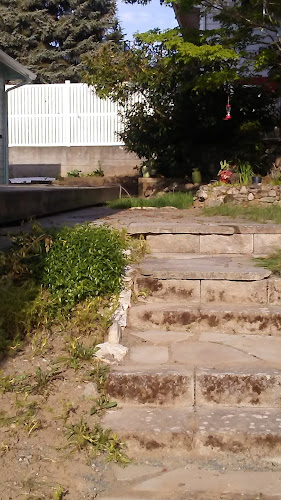
More posts on these terraces will come later but today’s post will only be about the lower terrace section next to the walkway, way in the far ground but not visible in the above photo. So (below)now we are from the other end, where this post is concerned.
As you can see, aside from 3 lovely deciduous trees, there was nothing back here but an overgrown laurel, weeds, grass and two vinca’s about to overtake the lower walkway.

Note the rocks lining the beds on both sides of the stairwell. I don’t really like rocks all lined up like this. I need to be able to step carefully into a bed this wide for weeding and this solid edge created a tripping hazard, both going up or down the stairs and stepping in for weeding. Also, the rocks caught the hose as I pulled it up or down.

Firstly, I sprayed the weeds and grass with an organic herbicide. After a few weeks, I turned over the decomposing remnants. Now I have a blank slate to work with.

(Note:
in my experience, organic herbicides work best on shallow rooted, weak weeds
and grasses. As you can see it killed the grass and Nigella weeds, some of the
baby dandelions but not the established dandelion roots nor the vinca. Those I
dug out. Organic sprays don’t really travel all the way to the root, in my
experience but they do weaken the weed considerably so hand digging is easier
when dealing with as thick a mass as I was faced with here.)

There
is such a slope (left to right) to the soil here that water runoff would keep
the plants from being watered. So I dug some of it out to level it. Mind you, I
moved that soil to other parts of the garden that I needed soil, but since it
was so full of weed seeds, understand you are moving those seeds too. Weeding
will now be expanded to include where ever I moved that dirt. But alas, I
needed to do it.

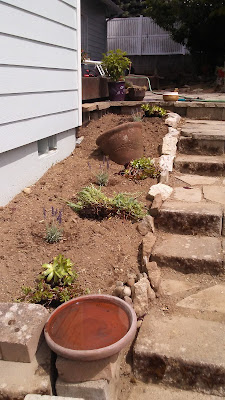
Working
my way up, turning over soil. The now cleaned-up bed, with only the vinca to be
dug out. Note again the rocks lining the bed against the stairs.
Now comes the fun part. Since the slope is so steep, I needed to create pockets in which to plant that could slow down the progression of water run off so the soil around the plants could absorb water and hold for the roots to take it up. So, I took the rocks lining the stairs and created outcropping pockets. It was actually fun and creative in a way, placing them with different plants in mind. As I “planted” the rocks, I also started planting succulents and heat / dry loving plants since this on the south side of the property.

This angle is shot from above, the top of the stairs. All the others were from the bottom of the stairs.

In this photo, on the left lower, you can actually still see the collapsed retaining wall that I spoke of in an earlier post titled “In The Hot Bed” that my better half rebuilt.

I love the out-cropped side (right) so much more than the lined up side (left). I will be removing the rocks from the left side and creating out cropping there as well someday. For sure the right side holds water far more effectively than the left side.

What do you think? Outcropped or lined up all in a row?


I have left the rocks lined up at the base of this bed as you can see, In this situation they keep the water and dirt from spilling out onto the walkway. But I did reposition them all. I had to lift many that had been buried and shifted others. I think here lining them up works. I don’t trip over them and the hose doesn’t catch on them.
I am much happier with this bed now, and it holds water longer so it can seep deeper. And once these plants get established, I won’t have to water much at all.


* Sorry for the haphazard placement of photos and differing fonts in this post. The blogger platform kept making changes and wouldn't let me correct them. I gave up. I am skilled at gardening, but not skilled at I.T. It is what it is.
In bloom in my garden today: Geum, salvia, fuchsia, rose, kniphofia, coreopsis, lavender, aster, hesperaloe, hardy geranium, lobelia, cuphea, asclepias, verbena, persicaria, eupatorium
First photo credit NWMLS
All
other photos are author’s photos